Open a new document in
Photoshop with a preset size of
800x600. If you prefer a larger size, no problem, I just prefer smaller images when I'm writing tutorials.
Double click on the foreground color in the tool bar marked with red in this screenshot:
In the Color Picker window that opens you enter the value 304971 (darker blue) in the area marked with A and click OK:
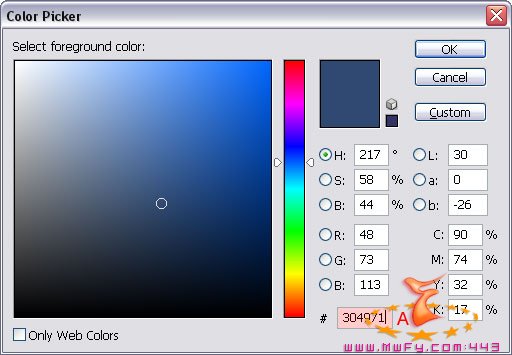
Tip: enter the value by using copy/paste(shortcuts already discussed in Step 1), because it will save you time and you will avoid mistakes.
Double click on the background color in the tool bar marked with red in this screenshot:
In the Color Picker window that opens you enter the value 7E9CB4 (lighter blue) this time. Click OK.
Select the Gradient Tool  in the tool bar (it might be hidden under the Paint Bucket
  tool ).
Go to the options bar and click on the button marked with A and double click on the gradient that shows both your current fore- and background color (marked with the red arrow):
Select a linear gradient by clicking on the linear gradient icon in the options bar (marked with red in the screenshot):

Make sure that the other settings are identical to the settings shown in this screenshot.
Use the following steps to draw the gradient:
- Hold down the shift key
- Move your mouse cursor to the top of your document
- Hold down your left mouse button
- Move your cursor to the bottom of your document
- Release the left mouse button
- Release the shift key
We hold down the shift key to force the cursor to move over a straight line towards the bottom of our document, which ensures that the gradient will be created under a straight angle.
Select the brush tool

. Reset the fore- and background color by pressing the letter
D on your keyboard:

Press
X to
switch the fore- and background color:

Select the
background color 
and enter a value of
F4F4F4 (light gray) and click
OK.
Add a new layer by clicking on the Create a new layer icon  .
.
Before we start painting, let's check the brush settings:

Make sure that you have selected the Clouds brush (A) and that the size of the brush is 70. You can change the size by clicking on B in our next screenshot and entering a value of 70 px for Master Diameter.
Close the window by clicking on B again:
Make sure the other settings in the options bar are identical to the ones shown in the first screenshot of the options bar.
Now take the brush and paint a basic shape and make sure the edges are the only areas where the background shines through:

Add a new layer by clicking on the Create a new layer icon .
Change the size of the brush to 50 and paint some smaller clouds on the inside. Move your mouse cursor over the image to see where I painted. You'll notice that I painted close to the top and left side of the cloud, since this is going to be the the brightest area in our final cloud. The lighter red is an area where I painted with a lower opacity (options bar). To make it yourself easy only focus on the maximum opacity of 100%.


Add a new layer by clicking on the Create a new layer icon .
This time change the size of the brush to 30 and paint some smaller clouds on the outside. Don't cover the complete edge, keep some slightly transparent areas intact. Move your mouse cursor over the image to see where I painted:

If you like the result, then add a new layer by clicking on the Create a new layer icon . Double click on its name to rename it to Clouds Merged. This layer will become the layer that will contain a merged copy of the 3 clouds layers.
First make the background invisible by clicking on the eye icon  in front of it. We do this, because we're going to use a technique that will merge all visible layers and since we only want to merge the cloud layers, we have to make the background invisible.
Make sure the empty top layer (Clouds Merged) is active (it will have a  icon in front of it) and now press Ctrl+Shift+Alt+E (Command+Shift+Control+E on the Mac) to merge all visible layers on the layer Clouds Merged.
After you're done, turn off Layer 1, Layer 2 and Layer 3 and turn on the Background layer:


