In the first part of this tutorial we got our major elements placed and the composition pretty much worked out. In this part, we will use a variety of techniques to unify the images and to create the mysterious, slightly ominous effect we are after.
INTEGRATE JEFF INTO THE COMPOSITION AND SET THE MOOD
Temporarily hide the groups JEFF and JILL by clicking the eye icons to the left of the groups¡¯ names in the Layers palette. The cold blue tones and dramatic lighting of the subway image already lend an air of mystery and intrigue. We will intensify feelings by making the blue even cooler and more saturated and the light more glaring.
References made to right and left are absolute, meaning it¡¯s your right and left I am referring to as opposed to Jeff or Jill¡¯s right and left.
|
|
| STEP 1 |
|
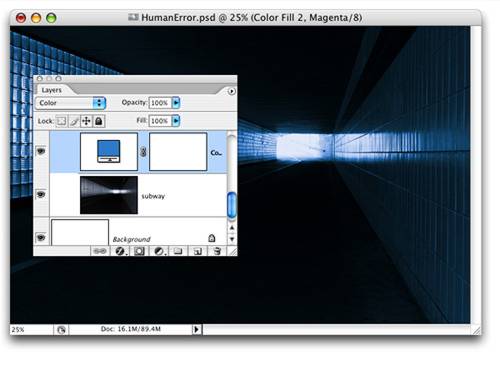
| Click the Create new fill or adjustment layer button at the bottom of the Layers palette and choose Solid Color. When the Color Picker appears, pick an aqua blue (I used: C-89, M-16, Y-3, K-1) and click OK. Solid color layers are called fill layers. Fill layers, like adjustment layers, are completely nondestructive and can be edited at any time. At first, the entire background is covered by the blue fill layer. From the blending modes menu choose Color (way down at the bottom of the menu). Now the color of the fill layer is applied to the image below while allowing the dark and light values of that image to show through. |
|
|
| STEP 2 |
|
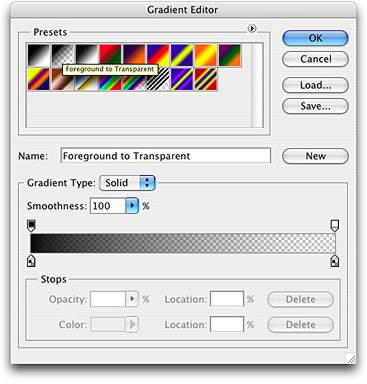
| To intensify the lighting effect, select the gradient tool and choose radial from the gradient styles in the options bar. Show the group JEFF by clicking the eye icon to the left of the group¡¯s name in the Layers palette. Click the gradient sample in the options bar to open the Gradient Editor dialog. From the presets pane, choose the second preset, Foreground to Transparent. Click OK. Make a new layer named flare and be sure your foreground color is white. Starting just to the right of Jeff¡¯s chin, click and drag to the left to create a glow. To intensify and localize the glow, repeat this step on another layer, but don¡¯t drag as far. Play with the layer opacities to modify the effect to your liking. |
| STEP 3 |
|
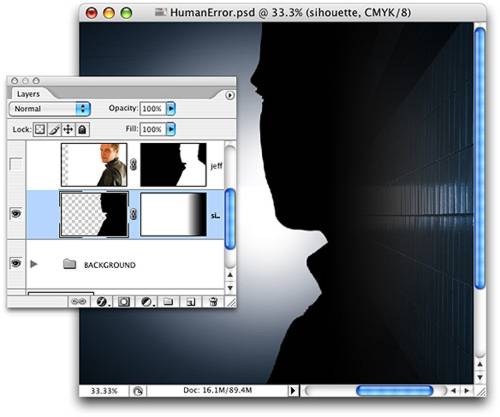
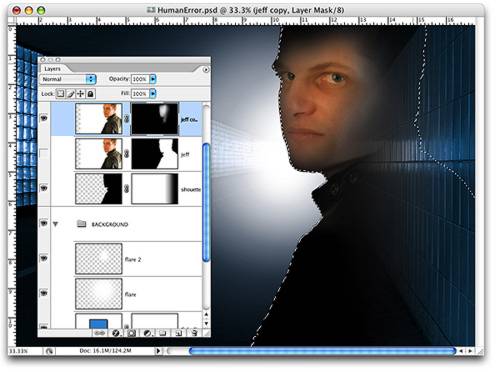
| Now to integrate Jeff into the composition. Make a new layer named silhouette and place it below jeff. Hide the layer jeff momentarily and Command/Ctrl-Click jeff¡¯s layer mask. This will load the mask as a selection. On the layer silhouette, fill the selection with black. |
|
|
| STEP 4 |
|
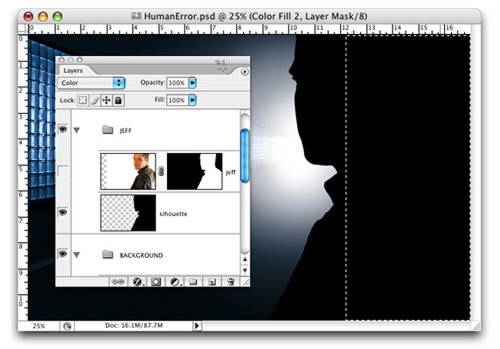
| Use the Rectangular Marquee tool to make a selection from the center of silhouette and extending to the edge of the image frame. Fill with black. |
|
|
| STEP 5 |
|
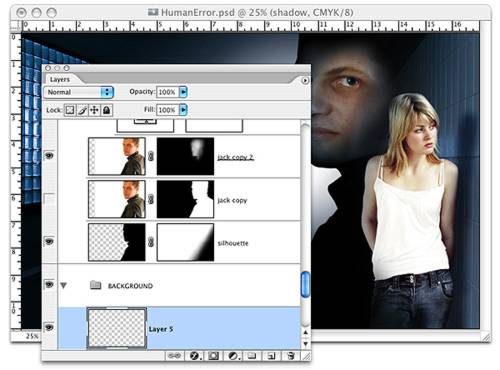
| Refer to the image above for the next three steps. Add a layer mask to silhouette. Select the gradient tool, choose linear gradient from the options bar and Foreground to Transparent from the presets in the Gradient Editor. Start at the right edge of the image frame and drag into the image. Release about where Jeff¡¯s neck meets the collar of his jacket. This will blend the right side of the layer silhouette into the subway wall. |
| STEP 6 |
|
| Unfortunately, the channel selection we made when we first knocked out Jeff¡¯s background didn¡¯t do a great job along his face. Zoom in close and you¡¯ll see the edge looks pretty ratty. You want this edge to be very clean. Use the Pen tool (choose the path option in the options bar) and make a path along the edge of his face on the outside of the rough edge that currently exists. Zoom in really close when doing this to make sure your path is accurate. It isn¡¯t necessary to go along the coat, because that will be mostly covered by type. After you get to the collar of his jacket you can take the path into the silhouette, up to the top of the image window, and close the path by clicking on your starting point. |
| STEP 7 |
|
| Load the path as a selection, add a one-pixel feather, and fill with black. Make sure you have the silhouette layer itself selected, not the layer mask. Save your document. |
|
|
| STEP 8 |
|
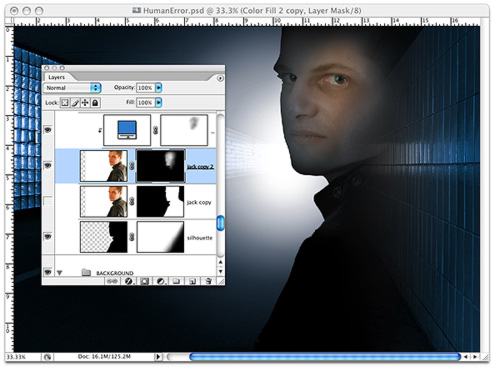
| Show jeff and duplicate the layer. Hide the original¡ªit¡¯s just there to preserve the original mask. Fill the layer mask on jeff copy with black. Command/Ctrl-Click on the layer mask of jeff to load it as a selection. Then, working on the layer mask of jeff copy, use a large soft brush (about 250 pixels) with white paint and light pressure (if you are using a graphics tablet; otherwise lower the flow or opacity to about 20%). Gradually reveal Jeff¡¯s face. The eye on the right of the image should be the most opaque. The other eye and rest of the face should be barely visible. |
|
|
| STEP 9 |
|
| Duplicate the color fill layer you used to colorize the subway and drag that layer above jeff. The blending mode should still be Color. Press Option-Command-G/Alt-Ctrl-G to use the layer jeff as a clipping mask. Jeff (the image) is now colored with the same blue as the subway but, although we want Jeff to have the same blue tint, we don¡¯t want the tint to be as strong on him as it is on the subway. We still want to keep some of his human color, so reduce the layer opacity of the solid fill layer to 66%. On the mask use a brush and black paint to gradually hide part of the color over the eye on the right. You may need to spend some time fine-tuning the masks to get just the effect you want. |
|
|
| STEP 10 |
|
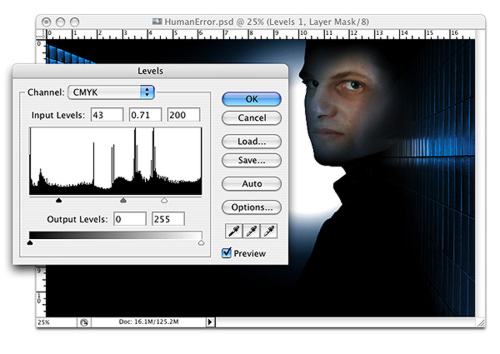
Add a Levels adjustment layer above the color fill copy layer and increase the contrast of Jeff¡¯s face. Change the blending mode of the group to Normal to prevent the adjustment layer from affecting the layers outside the
group. |
INTEGRATE JILL INTO THE COMPOSITION
| STEP 1 |
|
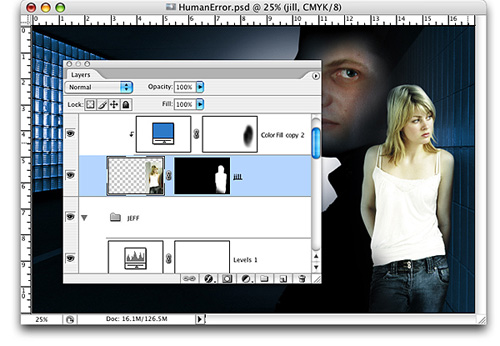
| Show and open the group JILL. Again, duplicate the color fill layer used to colorize subway and drag it above the layer jill. Press Option-Command-G/Alt-Ctrl-G to create a layer clipping mask group. Lower the opacity to 40%¡ªwe want Jill to have more color than Jeff to bring her forward and make her look more human. On the layer mask of color fill copy 2, paint with black and a low flow or pressure to gradually reduce the amount of blue on Jill¡¯s face and the front of her body. |
|
|
| STEP 2 |
|
| Move the to jill¡¯s layer mask and use a large soft brush with black paint to hide the lower left portion of her jeans and cause her lower body to fade into the background. |
Add a Levels adjustment layer above jill. The original photo of Jill was much cooler than the photo of Jeff. You need to color correct Jill slightly to make her skin tone match Jeff¡¯s. In the Levels dialog, choose Magenta from the channel menu at the top (remember our final document is being built in CMYK because it will be printed on a commercial printing press). Move the left slider to the right to increase the amount of magenta in the image. Change the blending mode of the group to Normal.
MATCHING THE LIGHT SOURCES
To effectively integrate (composite) the image of a person into an environment other than the one in which he or she was originally photographed, you may need to take steps to reconcile the light sources. Many professionally lit photographs have more than one light source. There is usually a main light source and one or more secondary light sources. Jill was photographed with a strong light on her face, but there is another light source (perhaps reflected off the wall she is leaning against) that is illuminating the opposite side of her body. Cast shadows are extremely important if you wish an object or person to appear as if they are truly part of an environment. A cast shadow on the wall will quickly establish that Jill is actually in the subway leaning against the tile wall. But, the shadow would have to be created by the secondary light source and, as such, cannot be very dark. Some reference to the primary light source needs to be made. By adding a bright light on the wall just to the right of Jill you can create the illusion that, perhaps, the wall is on a corner and a strong light is spilling around the corner lighting up Jill¡¯s face.
|
|
| STEP 1 |
|
| Make a new layer named shadow and place it below the layer jill. Use a brush and black paint to paint an abstract shape that approximates a cast shadow. You may want to blur the layer slightly if your shadow looks too lumpy or heavy-handed. Reduce the Layer opacity to 67% and change the blending mode to Multiply. |
| STEP 2 |
|
| To create the sense of the strong light spilling around the corner, make a new layer above the flare 2 in BACKGROUND. Make your foreground color white. Select the gradient tool, choose Linear gradient and Foreground to Transparent. Open the image window a little and start your drag slightly out of frame on the right and drag toward Jill. Release just as you overlap her body. Use Layer opacity to adjust the effect to your liking. |


 Using Color and Light to