As much as we like to think of ourselves as creatures of reason, we humans are emotional beings. For any ad or visual composition to be truly effective, it must tell a story and elicit the right emotion. In this tutorial you will use color and lighting to create a dramatic introductory spread to a magazine short story. These same elements, techniques, and concepts in another configuration could be a movie poster or a billboard.
This tutorial will be presented in three parts. Here¡¯s how I¡¯ve broken it down and a list of some of the topics that will be covered in each installment.
Part 1. Set up the final document, knock out the backgrounds of the people and place the people in the final document. Topics covered: Channel selections, Pen tool, Free Transform, and layer masks,
The images have been provided by iStockphoto.com and you are welcome to use the images for the purpose of working this tutorial only. They cannot be sold or used for any commercial purpose without the permission of iStockphoto.com.
In this story a young woman meets a stranger on the subway, setting off a series of events that will turn her view of reality upside down. The story is loaded with mystery, and intrigue. There is an uneasy sense of some impending disturbing event. The story takes place in the cold, unnatural light of a subway. Your challenge is to capture these feelings visually. Effectively evoking these feelings will inform the reader about the story and, hopefully, pique their interest. Color and lighting will accomplish this to a large extent while integrating the images visually and putting the two people together in their own strange and intimate reality -- removed from the normal look and feel of the original photography.
This is a two-page spread. The image will need to be created to the bleed size of the publication (usually about 1⁄8˝ beyond the trim size). To make things easy let¡¯s say the bleed size is 17˝ x 11˝, the trim size is 16.75˝ x 10.75˝, and the live area¡ªthe area within which all important material must be kept¡ªis 16.5˝ x 10.25˝.

SET UP THE FINAL DOCUMENT
| STEP 1 |
|
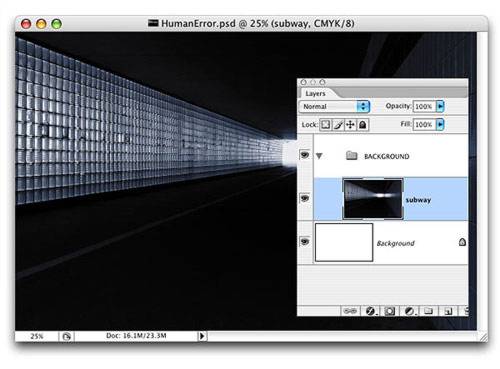
| Make a new document 17˝ x 11˝, CMYK, background color black. To make the file easier to work with, we¡¯ll use a resolution of 150 ppi (normally magazine artwork would be created at 300ppi.) Save the document as HumanError.psd. |
| STEP 2 |
|
| Open the image Subway.jpg. Double-click on the layer background and rename it subway. |
|
|
| STEP 3 |
|
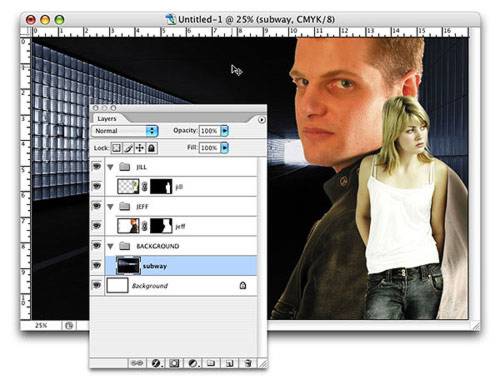
| In your document HumanError.psd, hold Option/Alt and click the Create a new group button at the bottom of the Layers palette. Name the new group BACKGROUND and click OK. I find it helpful to distinguish groups from layers by using all uppercase for group names and all lowercase for layer names. Hold down the Shift key and drag the layer subway from Subway.jpg into the group BACKGROUND in HumanError.psd. Holding down the shift key will place the layer in the center of the image window. Close Subway.jpg¡ªno need to save it. Save document HumanError.psd. |
KNOCK OUT JEFF¡¯S BACKGROUND
In all my tutorials I stress the importance of working nondestructively. This means working in a way that keeps your options open and allows you to make changes quickly and easily. At its most basic, this means not deleting or permanently altering pixels if at all possible. Layer masks are an important component of working nondestructively. With layer masks, rather than throwing background pixels away you can simply hide them, leaving them intact if you need them later (which very often you do when the client or your boss starts to make changes).
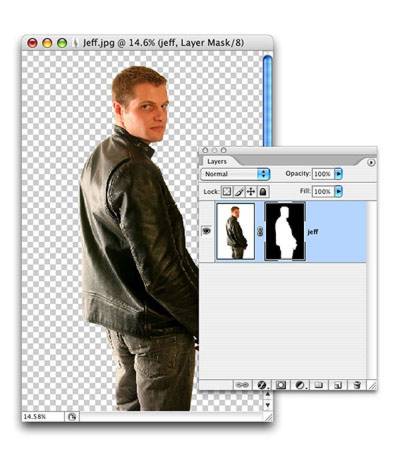
I¡¯ve named our two leading characters Jeff and Jill. Open the document Jeff.jpg. Before you bring Jeff into your final document you will knock out (eliminate) the white background, and you will use a layer mask to accomplish this. Yes, it¡¯s true you¡¯ll probably never want that white background again, but to help you get used to the idea of working nondestructively, I¡¯d like you to use a layer mask to hide those pixels rather than throwing them away.
|
|
| STEP 1 |
|
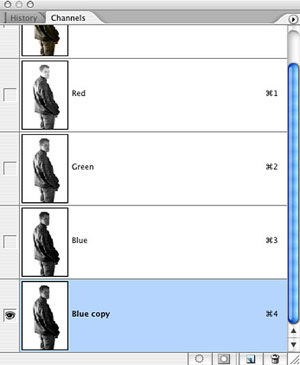
| In your open image Jeff.jpg rename the background layer jeff. To knock out the background using a layer mask, you first need to make a selection around Jeff. Since he is against a solid white background, a channel selection is the way to go. Open the Channels palette. Highlight each channel and see how much contrast there is between Jeff and the background. You want to find the channel in which Jeff is the darkest. In this case it¡¯s the Blue channel (this image is still in RGB). Duplicate the Blue channel by dragging it to the Create new channel button at the bottom of the Channels palette. |
|
|
| STEP 2 |
|
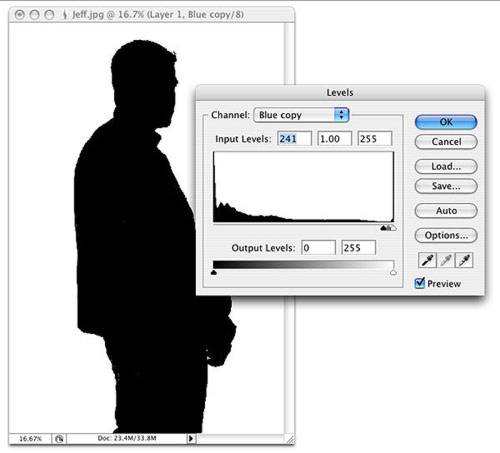
| With the new channel (Blue copy) highlighted, use the Levels command (Command-L/Ctrl-L) to force the image of Jeff to go as black as possible by moving all the sliders to the far right. In effect you are trying to create a silhouette. Use a brush and black paint to clean up any remaining white areas. As long as Blue copy is the only channel highlighted when you paint on the image in the image window you are only affecting that channel and are not damaging your original image in any way. |
| STEP 3 |
|
| Activate all color channels by clicking on the RGB composite channel at the top of the channels stack. Then, Command/Ctrl-Click on the Blue copy channel to load it as a selection. |
|
|
| STEP 4 |
|
| Zoom in close and you will notice the selection does not go right up to the edge of Jeff¡¯s body. To get rid of all the background and avoid ¡°halos¡± (a white rim of background showing around the figure) and to accommodate a slight feather, you need to contract the selection, pull it in so it slightly overlaps Jeff¡¯s body. Go to Selection>Modify>Contract, enter 3 in the Contract by field, and click OK. Add a layer mask by clicking the Add layer mask button at the bottom of the Layers palette. Save the document, choosing Photoshop from the Format menu. Once you have added a layer mask you can no longer save it as a jpeg. |
COMPOSITE JEFF INTO THE FINAL DOCUMENT
| STEP 1 |
|
| In your document HumanError.psd, close the group BACKGROUND and make a new group named JEFF. Drag the layer jeff from Jeff.psd into the new group. |
|
|
| STEP 2 |
|
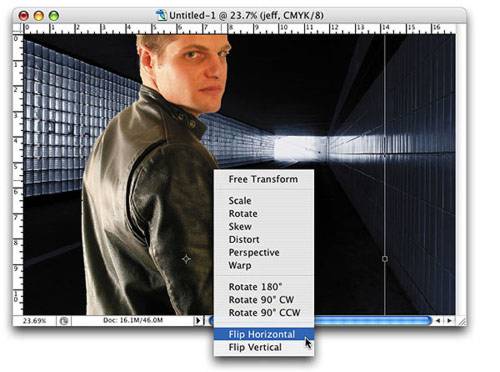
| The image of Jeff will automatically be converted to CMYK. In our composition we want Jeff to be facing the opposite way, into the spread. Activate the Free Transform command (Command-T/Ctrl-T) and Control-Click/Right-Click to bring up the Free Transform menu. Choose Flip Horizontal. To achieve the dramatic effect we are after it is necessary to enlarge Jeff. Scaling an image up is something to be avoided whenever possible because it is a destructive move that does degrade the image. But sometimes it is necessary. Here the image of Jeff will be treated in various ways to create the effect we are after, so the amount of softening that will occur due to resampling (adding pixels when scaling) will be insignificant. Enter 140% in the width and height fields in the options bar and click the check mark or press enter. You can close the document Jeff.psd. |
KNOCK OUT JILL¡¯S BACKGROUND AND COMPOSITE HER INTO THE FINAL DOCUMENT
|
|
| STEP 1 |
|
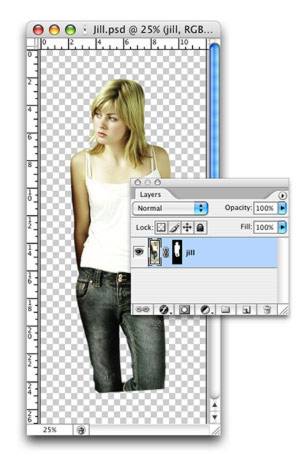
| Open the image Jill.jpg. Rename the background layer jill. This time use the Pen tool to create a path and make a selection around Jill before adding the layer mask. The Pen tool is probably my favorite selection tool, but it is one of the least intuitive. Okay, so choose the Pen tool; be sure to select the second option, Paths, in the left portion of the options bar. The default is the first button, which creates a new Shape layer. From the path area option buttons on the far right choose the last one, Exclude Overlapping Path Areas. Make a path around Jill slightly inside the edge of her body. This will allow you to add a feather without picking up the background. You won¡¯t be using the lower portion of her legs at this point, so you can close the path below her knee. With this working path still active, make another path to get the area between her legs. Command/Ctrl-Click on the path thumbnail in the Paths palette to load the path as a selection. Add a 1-pixel feather, then add a layer mask. |
|
|
| STEP 2 |
|
| In your final document, HumanError.psd, make a new group named JILL and drag the layer jill from Jill.jpg into the new group. Use Free Transform to flip the image horizontally. Position Jill approximately as shown in the figure and refine the layer mask using a brush and black paint to clean up any halos that may be showing along the edge of Jill¡¯s body and to soften her hai. Save the original image of Jill as Jill.psd and close it. |


 Using Color and Light to