Let me start first by saying that these tools were first introduced in
Photoshop 7.
The Clone Stamp  and Healing Brush
  tools are best used on a separate layer.
Use the photograph that we used throughout this Photoshop tutorial and add a new layer on top by clicking on the Create a new layer icon  in the Layers Palette. Either select the Clone Stamp or the Healing Brush tool and look at the options bar; you'll notice an option called Use All Layers
  .
.
Make sure that this option is selected when you plan to use either the Clone Stamp or Healing Brush tool on a separate layer.
Because we have selected Use All Layers, all changes will take place on the empty layer and not on the original. If we make a mistake, then we can simple select the Eraser Tool  in the tools bar, select a soft or hard edged eraser with the right size and opacity in the options bar and slowly erase the corrections we made.
The greatest advantage is of course that we can now easily correct our mistakes. It's also important to mention that we can make other corrections to this separate layer, like applying a filter like Gaussian Blur to soften the edges, but also adjust color and lightness, change opacity or even add a mask if we feel like it, all things we wouldn't be able to do if the corrections were applied to the original image instead.
Also important to know is that you you're not limited to a single layer that contains the corrections of the Healing Brush or Clone Stamp tool. You can have separate layers on top of the original, each one with a different purpose but all with one thing in common: Use All Layers selected.
Please remember; the source area that you use to clone or heal when you use several layers will always be what's visible in your document window.
To give you an example; let's say that we want to remove the blemish in this part of the photograph:

We add a new layer, grab the clone stamp or healing brush tool with Use All Layers selected and remove the blemish:
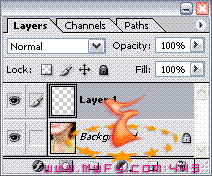
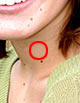
If we now add another layer on top of Layer 1 and use the area that has the blemish removed (marked with the red circle in the last image) as the source area for the tool we use, then the tool will only use the source data that's visible. No blemish is visible because layer 1 placed new pixels on top of this blemish, so the source that will be used are the pixels on layer 1. Of course, if we select an area outside this red circle as our source, then the tool will use the pixels of the Background layer.
I know, it's a mouth full, but I hope you understand it, otherwise experiment with more than 1 layer to understand the whole concept a bit better.
Layer Masks are a very powerful part of
Photoshop and that is for a couple of reasons:
- Layer Masks are editable selections that play an important role in non destructive editing
- Layer Masks offer flexibility because they can be almost completely treated as a full gray scale image, which allows the use of filters, selection tools, adjustment tools, etc.
- They have a visual strength, meaning that with a short look on the layers you can see how they affect the image
- They offer extra flexibility by being part of vector masks, layer sets, adjustment layers, etc.
- Layer masks allow you to save selections
It's important to look at my Layer Masks Photoshop tutorial to understand and truly appreciate the power of masks and what role they can play in non-destructive editing. Again, I want to remind you that all layers, layer styles, vector masks, layer sets (or groups as they are called since PC CS2) and adjustment layers can have a mask attached.
With the
Dodge 
and
Burn 
tools it's the same story as with the Clone Stamp and Healing Brush tool; they're best used on a separate layer.
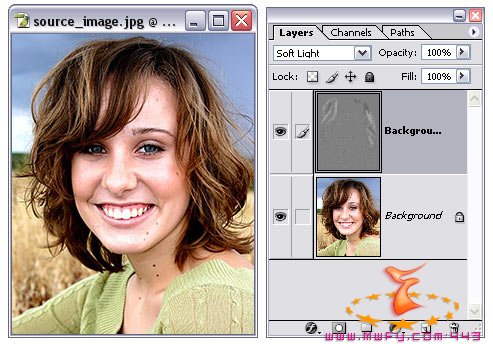
For that we're going to need another 50% Gray layer. Again, open the image that we've used so many times and again add a 50% Gray layer and this time set the blending mode to Soft Light. Make sure that the 50% Gray layer is active ( a  in front of it).
Now select either the Dodge or Burn tool and select a small soft brush and start working on some highlights and/or shadows. Again, changes will only take place on the 50% Gray layer so the original stays intact.
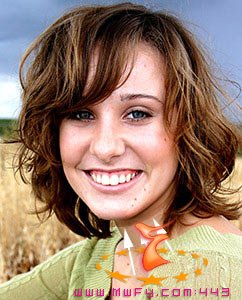
In this example I've used a combination of doge and burn to work on a few strands of hair:
There's one shortcoming about this technique and that is that the Range option in the option bar...
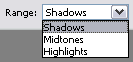
...will have no effect. The range option normally tells the Dodge or Burn tool which pixels to affect most. Since we're working on a 50% Gray layer, we always have the same average light value and there are no shadows and highlights (both part of the range options), only a single midtone.
I don't consider that a major limitation, because now have the chance to go back to correct your mistakes and most corrections done with the dodge and/or burn tool will be minor anyway.
We can correct dodge and burn mistakes by using Undo (Ctrl + Z or Command + Z on the Mac), Step Backward (Alt + Control + Z or Option + Command + Z on the Mac), the history palette or by painting back the areas on the 50% Gray layer that we've darkened or brightened with the original color using a brush  and a foreground color with a value of #808080 (which is 50% gray as we've seen in section #1 about 50% Gray layers).
If we still want to be able to use dodge and burn using the range option, then we need a different approach.
Let's say that the area that we want to adjust is mainly inside the selection shown in this example:
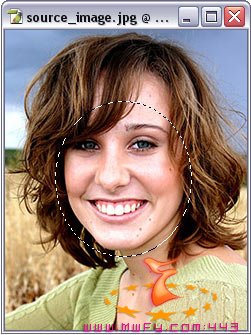
Open the photograph and make a rough selection of the face with any of the selection tools as shown in the above example. I've used the Elliptical Marquee tool  to make it easier on myself, but in reality I would have taken more time for this selection by using for example the Lasso Tool
  and/or creating a mask. So consider to make it easy on yourself too, after all it doesn't change anything about the basic principle that I'm going to discuss here.
We're going to make this a soft selection to avoid that any adjustments close to the actual selection will end in a very abrupt way like in this example:
We turn the selection into a soft selection by going to the menu and selecting Select / Feather...
We now have to enter a Feather Radius:
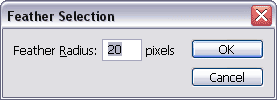
The number depends on the resolution of the image and since our photograph is rather small, I've selected also a rather small value of 20 and probably a value of 10 will be fine too (experiment)
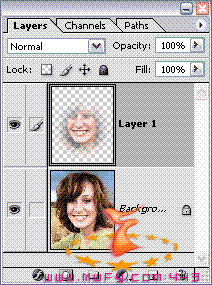
The next step is to copy the area with the soft selection to a new layer. We do that by right clicking (control on the Mac) on the layer's name in the layers platte (in our case it's named Background) and selecting the option Layer via Copy in the context menu...

...and the result is this:
Now you can use burn and dodge on this layer with all the advantages of the range option without touching the original.
Instead of dodge and burn you can of course for example also use levels or curves adjustment layers in combination with a mask, but that again doesn't give you the range options that the regular dodge and burn tools allow, but like I said earlier, I've never considered that a real limitation. The truth of the matter is that dodge and burn are generally only used to make minor adjustments so the first technique in this section that used a 50% Gray layer will be in most cases sufficient.
The
Sponge Tool 
is used in
Photoshop to change the saturation of one particular area in an image. It's the same story as with the dodge and burn tool and that is that it's mostly used for a few minor corrections for small areas. For that purpose the last solution that was shown in the previous section about dodge and burn will work just fine. Instead of using this tool it's of course possible to make use of an adjustment layer like for example a Hue & Saturation adjustement layer in combination with a mask.
Non-destructive editing doesn't stop here. Other techniques that can be used for example are duplicate layers that are blended with the original image using a specific blending mode or opacity. A good example is for example the soft focus effect...

...which is nothing more than a duplicate of the original layer set to 50% opacity, blurred with filter / blur / gaussian blur... and a radius of 3 pixels (use a wider radius to increase the effect)..
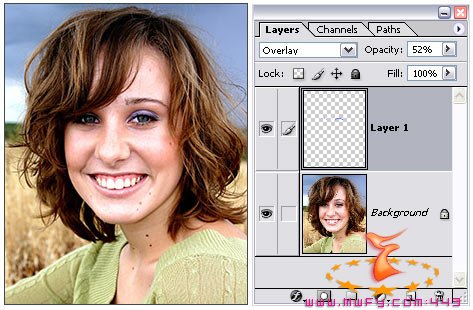
But you can also use a soft blue brush on a separate layer set to overlay to add some eye shadow:
Non-destructive editing is a very important aspect of Photoshop. I hope that my tutorial makes it clear how powerful all these techniques can be used not only to achieve results fatser, but also to be able to make single adjustments as many times as possible without interfering with other adjustments at the same time. The more you gett he hang of these techniques, the more you will see the quality of your work improve.
I end like always by saying that I hope you enjoyed this Photoshop tutorial.


