This Photoshop tutorial describes how to retouch photographs without ever touching the original. The same techniques can be used for any graphic design, not just photographs.
The great advantage of non-destructive editing in Photoshop is that you can easily adjust image effects or adjustments, even weeks or months later. They also allow quick editing and increased flexibility. Everyone who uses Photoshop should know these techniques, because they really make Photoshop so powerful.
This tutorial is split into several sections:
- 50% Gray Layer
- Adding Noise
- Sharpening
- Lighting Effect
- Layer Styles
- Adjustment Layers
- Clone and Patch Tool
- Masks
- Dodge and Burn
- Sponge Tool
- Other Techniques
Look at a 50% Gray as a neutral color. Everything darker or lighter than 50% Gray will have an effect on most blending modes (but not all). You'll understand this better throughout the course of this tutorial.
Let's have a look how we can fill a layer with 50% gray.
Add a new layer by clicking on the Create a New Layer icon  in the Layers Palette. Fill this layer with 50% Gray by going to the menu and selecting Edit / Fill.
The following window will pop-up:
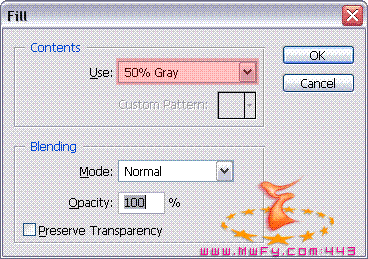
In the pull down menu marked with red we then select 50% Gray and click on OK.
There is a second way to fill this layer with 50% Gray;
Edit the foreground color...
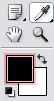
... by clicking on the foreground color in the tools bar.
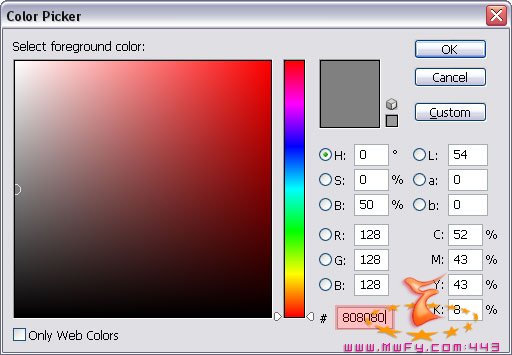
In the Color Picker window that opens you type 808080 in the area marked with red.
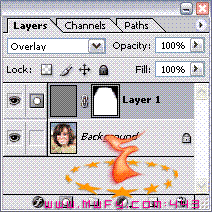
But wait, there's even a third way to add a 50% Gray layer. Add a new layer by holding down the Alt key (Option key on the Mac) and clicking on the Create a New Layer icon .
A window will pop-up in which we can set the blending mode for example to Overlay and by selecting the option Fill with Overlay-neutral color (50% gray):
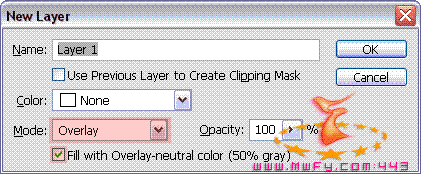
In this example I've used the Overlay blending mode, but you can select any other blending mode in this New Layer Window to create a neutral layer as long as that particular blending mode allows you to select a neutral color that's either 50% Gray, Black or White and if it does, then the text at the bottom will change accordingly. For example select Difference and the text at the bottom will change to 'Fill with Difference-neutral color (50% Black)'.
In this Photoshop tutorial we're only going to focus on 50% Gray layers and for the following blending modes 50% Gray is considered neutral:
- Overlay
- Soft Light
- Hard Light
- Vivid Light
- Linear Light
- Pin Light
Be aware that some of these blending modes are not available in older versions of Photoshop.
In the following sections we're going to make use many times of the following image:
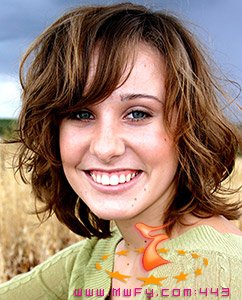
You can right click on it if you have Windows and then select Save target as... to save this file on your hard drive. I don't know how to save the image on a Mac, but hopefully most Mac users won't have a problem to figure that out on their own.
The first thing I'm going to show you is how to add noise to an image by using a separate layer.
Open the image and add a new layer by selecting the Create a new Layer icon in the layers palette.
Fill this layer with 50% Gray by selecting in the menu: Edit / Fill... and selecting 50% Gray:
Click OK.
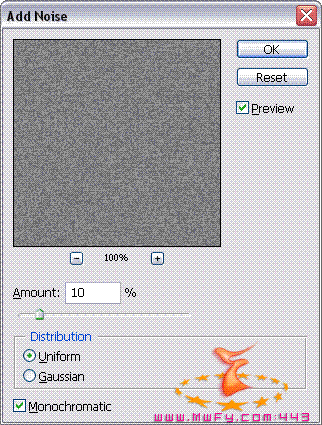
Now go to the menu and select Filter / Noise / Add noise... and use the following settings:
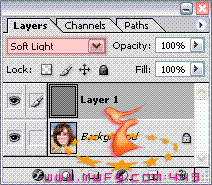
The next step is to go to the layers palette and to change the blending mode to Soft Light:
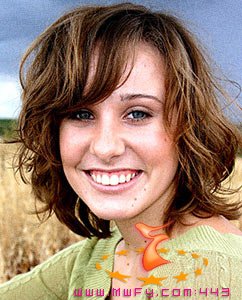
The result:
We could also have picked Overlay as our blending mode which increases the contrast of the noise:

This is a good example of what non-destructive editing is all about; we're able to add noise without ever touching the original. If we need a different setting, then we just throw away Layer 1 which contains the noise, create a new layer, fill it again with 50% Gray and use different settings for the noise filter. Now you might wonder why it's not better to use undo. There are two reasons for that;
- Undo is not possible if you just opened this file (with the noise layer included), since the history is not saved.
- Undo is not always possible, since Photoshop restricts the numbers of steps you can take back, depending on your preferences and memory limitations.
You might wonder why it's not better to duplicate the original background layer and apply the noise to this duplicate. Yes, that works, but quite often you have more than one Photoshop technique applied to an image.
Let's say that you've added noise and applied 5 adjustments to a single layer. Throwing away that layer would would mean that you're not only throwing away the noise but all 5 adjustments.
So you would have to start all over which is a lot of work and can easily lead to mistakes. I admit, if you're lucky the noise was the last thing you added, but quite often this is not the case and again, like I said earlier, you can't undo an adjustment for an image that was saved and closed before you had the desire to make this adjustment.
One other advantage of this non-destructive approach in Photoshop is that we're able to make adjustments to this noise layer only. In our example we might consider to apply an effect to the noise (slight blur for example), use a different opacity for the noise layer or even change the blending mode to a different one for which 50% Gray is considered neutral. We can even add a mask to the noise layer to remove the noise in the sky:

Of course in this image it doesn't make sense to add noise to the face only (it's just an example), but it is important to know that there will be occasions that we only want to add noise to one particular area and this should remind you how to do this.
In this example we've added noise to a photograph, but of course we can add it to everything we like. This technique is for example very useful if you want to design textures or want to make photographs look older (in combination with other techniques).
In this section I'm showing you a technique that is commonly called High Pass Sharpening.
It's another example that shows how to do things in a non-destructive way.
Again, open the original photograph.
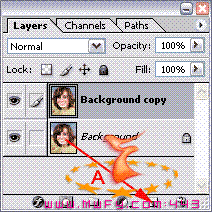
We're now going to duplicate our background layer.
Click on its icon in the layers palette, hold down the mouse button and drag (A) the layer to the Create a new layer icon and release the mouse button. This will create a new active layer ( in front of it) called Background copy:
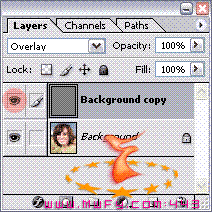
Set the blending mode of this layer to Overlay.
This time go to the menu and select Filter / Other / High Pass... and select a radius of 0.5 pixels and click OK.
We have now sharpened the Background layer using the Background copy layer and again this an example of a non-destructive technique.
Turn off/on the eye icon  in front of the Background copy layer a few times to see the difference between the original version and the sharpened version:
You're not limited to use the Overlay blending mode for this technique and you might try out these other 6 blending modes that I told you about earlier for which 50% Gray is considered neutral:
- Overlay
- Soft Light
- Hard Light
- Vivid Light
- Linear Light
- Pin Light
Btw, and this is slightly off-topic, the High Pass sharpening technique is a very popular technique to sharpen


