Create the Background
First start a new document. I started with a preset of 640 x 480.
Next set the Foreground color to #F5840C (Shade of Orange) & Background color to #000000 (Black). (Ultimately, you choose your own varying color swatches, as this effect produces different results but the same effect.)
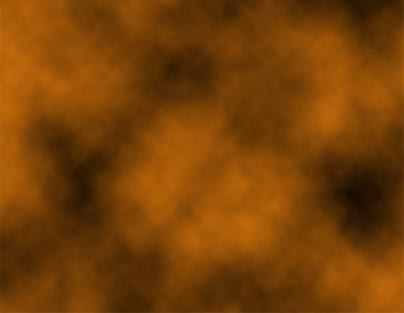
Next, create a new empty Layer and apply a 'Clouds' Filter ('Filter/Render/Clouds') to produce a result similar to the below capture.
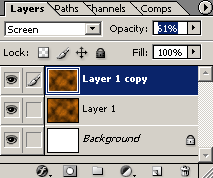
The color combination here is a little too dark, so to lighten it up, simply duplicate that Layer, and set the Layer Mode to 'Screen'. And reduce the 'Opacity' to a level your comfortable with. I used 61%. (As captured below)
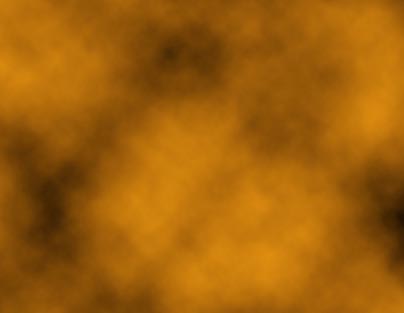
This will generate the below result.
Set Smudge Tool Options & Brush Preset Size Preset
Next, lets set a 'Brush Tool (B)' preset to be used later in the tutorial. So, simply select the 'Smudge Tool (R)'  on the main Toolbar. on the main Toolbar.
Then go up to the 'Options Bar', and select the 'Brush Preset Picker' and from the list choose a large brush. I selected tip hardness of 19, but adjusted the Diameter slider to 46. (As captured below)
While still with the 'Smudge Tool (R)' go back up to the Options bar and choose a 'Strength Value' and tick the 'Use all Layers' option, as I hae captured below. This step is important and is the main trick used in created the tentacle effect.
Create A Path
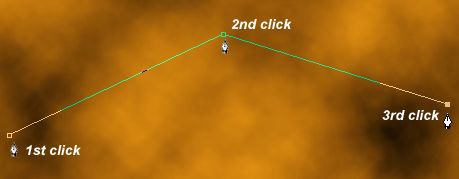
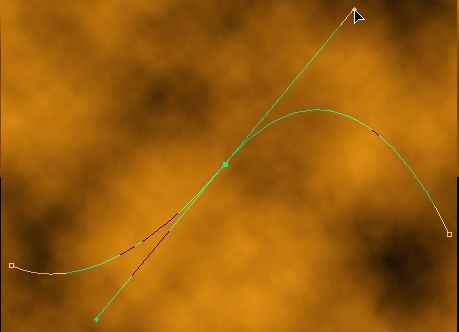
Next, lets create a simple curved path directly onto the document.
Select the 'Pen Tool (P)' on the main Toolbar  , with 'Paths' options selected up on the Options Bar, , with 'Paths' options selected up on the Options Bar,  , and click in succession to add three Anchor Points as I have captured below. , and click in succession to add three Anchor Points as I have captured below.
Next, select the 'Convert Anchor Point Tool' (hidden in the Pen Tool fly out menu), click on the 2nd Anchor Point and drag upper right-ward to form a curved path as I have captured below.
You can leave the path as it is, or to move or modify simply select 'Path Selection Tool (A)'  to move the entire path to a new location, or select the 'Direct Section Tool (A)' to move the entire path to a new location, or select the 'Direct Section Tool (A)'  to move or adjust any Anchor Point. to move or adjust any Anchor Point.
I went ahead and used the 'Direct Selction Tool (A)' and adjusted the 1st 'Anchor Point' to the left edge of the document. (As captured below)
Create the Tentacles
Now, everthing is in place.
Background is ready, Smudge & Brush Tool options are set and a Path to use that will form the shape of the tentacles.
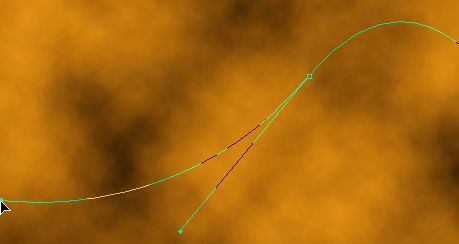
Create a new empty layer just above your background layer, so that (if you followed to this point) theres a total of three layers, as I have captured below.
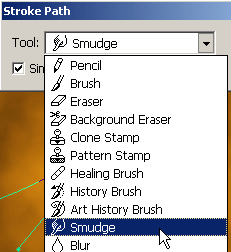
Next, select the 'Path' you created earlier with the 'Path Selection Tool (A)' . Next, right-click (Mac:Control click) to reveal the context menu, and from the list choose 'Stroke Path'.
The 'Stroke Path' option will prompt you to choose a Tool Preset. So from the dropdown list choose the 'Smudge Tool'. Tick 'Simulate Pressure' option, then 'OK'.
≡★ 免 责 声 明 ★≡
除本站原创外,本站所提供的所有教程均收集整理自网络,其版权归该教程直原始作者或原始出处所有!
除特别声明外,您可以在保持教程的完整和注明来源的前提下免费复制、转贴本站所提供的所有教程;但是,不可以盗链本站的图片!
除特别声明外,在未经许可的情况下您不得将本站所提供的任何教程(包括资源)用于商业用途;
如果确有需要,请自行与该教程的原始所有权者(即:原始作者或出处)联系,本站不提供相关服务;否则,由此而引发的一切后果由您自负!
|