Here's a detailed look to help simulate underwater scenes.
I first began with a 500x500 size document preset, set the foreground color to a shade of blue (I used #1680D1) and the background color to a dark blue (I used #0C1B6C).
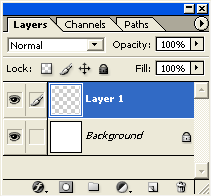
Create a new empty Layer (Shift + Ctrl + N (Mac: Shift + Command + N), just above the default document background Layer.
Activate that new empty Layer by selecting it in the Layers Palette.
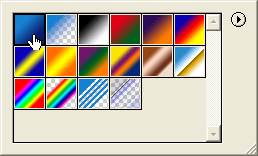
Next, select the 'Gradient Tool (G)'  on the Toolbar. on the Toolbar.
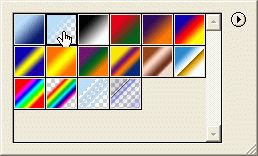
Then notice up on the Options Bar for that particular tool, the new options that are available, particularly, the 'Gradient Preset Picker'.
Select the 'Gradient Preset Picker' to define the gradient to use for this effect. I will use the 'Foreground to Background' preset as I have selected below (the first one).
Note: These colors are based on the Foreground and Background colors we set earlier.
Also, on the Options Bar choose the 'Linear Gradient' style
First one in the group of 5 gradient styles 
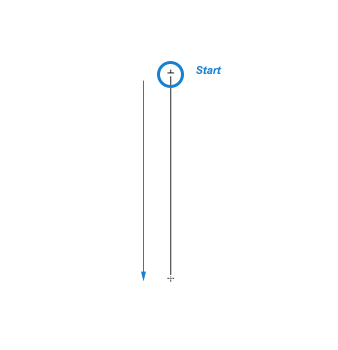
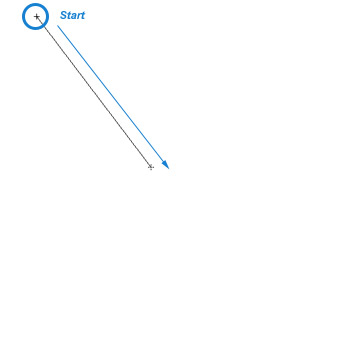
Next, still with the 'Layer 1' and the 'Gradient Tool (G)' active, start the gradient transitions roughly just above center point with a click and drag action.
To produce a similar result as below.
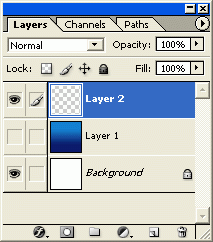
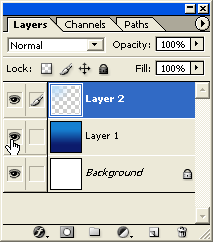
Create another new empty Layer (Shift + Ctrl + N (Mac: Shift + Command + N), just above the 'Layer 1'.
Activate that new empty Layer 2 by selecting it in the Layers Palette. Also, for the next step lets hide the 'Layer 1' for later use.
Next, select the 'Gradient Tool (G)' again on the Toolbar.
Set the foreground Color to a lighter blue. (I used #B9DDF9).
As before up on the Options Bar for that particular tool, select the 'Gradient Preset Picker' to define the gradient to use for this next effect. I will use the 'Foreground to Transparent' preset as I have selected below (the first one).
Also, on the Options Bar choose the 'Radial Gradient' style 
Second one in the group of 5 gradient styles 
Also, Mode settings: Normal / Opacity: 100% / Transparency: ticked.
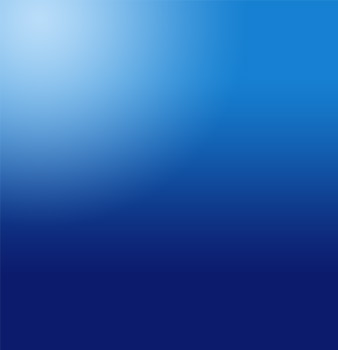
Next, still with the 'Layer 2' and the 'Gradient Tool (G)' active, start the gradient transition from the uppermost left hand corner as I have captured below.
To produce the following result.
Turn the visibility of 'Layer 1' back on.
You should now have the below result with the above steps.
So far, basically, just two gradients. A Linear gradient, dominating the background. A Radial gradient that will be used to simulate sun rays on the surface of the water.
Next on with the rippled surface effect.
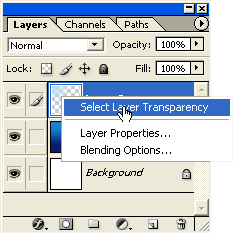
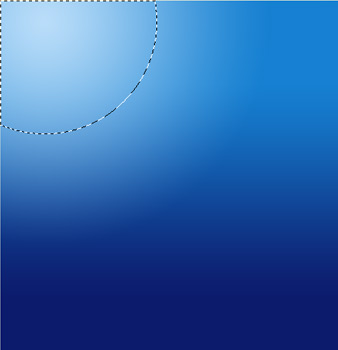
With 'Layer 2' selected in the Layers Palette, right click (Mac: Control + Click) on the Layer and from the contextual menu choose 'Select Layer Transparency'.
This will create a selection only around the pixel contents of this layer, as indicated by a marquee.
Next, for this selection apply 'Filter/Render/Clouds'. (Your foreground color should still be the #B9DDF9 light blue & the background color the dark blue #0C1B6C, that was set earlier).
Then, Ctrl + D (Mac: Command + D) to deselect the selection to reveal the below result.
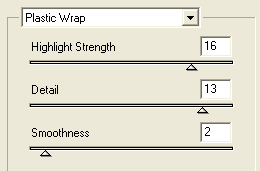
Next, still on 'Layer 2', go 'Filter/Artistic/Plastic Wrap' and apply the below settings.
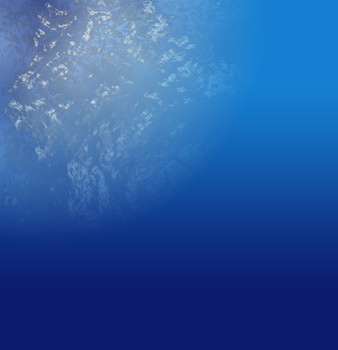
This will produce the following result.
Starting to take effect now. Let's apply some depth to the surface area.
Still on 'Layer 2', Ctrl + T (Mac: Command + T) to activate the Free Transform Tool for this Layer.
Then with the Ctrl key pressed (Mac: Command key pressed), click and drag the top most end points and drag outward. And also, click and drag the two bottom points and inward as I have captured in the below link.
This will provide a more realistic depth since the perspective is underwater, looking upward.
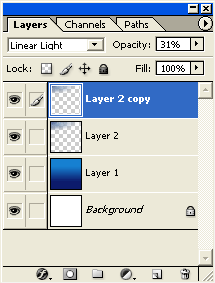
I then duplicated 'Layer 2' and set its Blend Mode to 'Linear Light' and dropped it's Opacity level down to about 53%.
≡★ 免 责 声 明 ★≡
除本站原创外,本站所提供的所有教程均收集整理自网络,其版权归该教程直原始作者或原始出处所有!
除特别声明外,您可以在保持教程的完整和注明来源的前提下免费复制、转贴本站所提供的所有教程;但是,不可以盗链本站的图片!
除特别声明外,在未经许可的情况下您不得将本站所提供的任何教程(包括资源)用于商业用途;
如果确有需要,请自行与该教程的原始所有权者(即:原始作者或出处)联系,本站不提供相关服务;否则,由此而引发的一切后果由您自负!
|