Add a new layer in
Photoshop by clicking on the
Create a new layer icon

and that's going to be
Layer 4.
Select the Brush Tool  and use a hard brush (hardness is 100%) with a size of 20. Change the foreground color to white (or a very slight yellow (close to indoor light) using a value of FFFFE8).
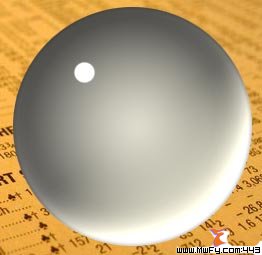
Place the highlight in the location shown here:
Go to the menu and select Effects/Blur/Gaussian Blur... and select a small radius of .5 and click OK.
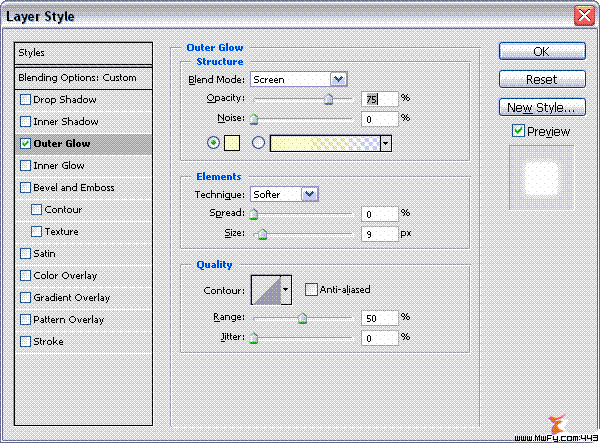
Go to the layers palette and click on the Add a Layer Style icon  to add a layer style and select the Outer Glow effect and use the settings shown here:
First make the
Layer 1 copy (the one above the background layer) the active layer by clicking on it; a

will appear in front of it.
Now set the Fill of this layer to 25% 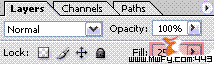
You'll notice that by doing that, that we're are getting closer to the final result:
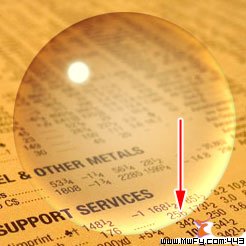
If the bottom is too bright (marked with the arrow), then just select the Layer Style of Layer 1 copy and lower the opacity of the Inner Shadow effect (or increase it if that's what you prefer).
We now click on the background layer with the newspaper image on it, to make it active.
Add a new layer by clicking on the Create a new layer icon .
With this layer (Layer 5) active we click on Ctrl + click (Command + click) on the thumbnail of the layer above (the one with glass ball, Layer 1 copy). The result is a selection in layer 5 that is based on this glass ball.
Press the letter D on your keyboard, which makes the foreground color black, the background color white 
We're now going to draw a gradient using the current foreground color (
black) in combination with transparency. Select the
Gradient Tool in the toolbar

(if in it's not visible, then look under the
Paint Bucket tool

).
Make sure that a Radial Gradient  (B) is selected in the options bar at the top and that the option Reverse (C) is selected.

If you don't see a gradient in your options bar (
A), that looks like one going from transparency to black, then double click on the gradient in the options bar (
A) and select the gradient from the list (the one right beside
D) and click
OK.
Draw the gradient by starting in the middle of your selection and end at the edge of this same selection.
We're now going to transform this selection in an elliptical shape by using the transform tool. Go in the menu to Edit/Free transform or press Ctrl + T (Command + T on the Mac). A rectangular box with 8 handles will appear.
Now pull the upper center handle downward (see A) until you have a shape that looks like the one in B.
Now press enter on your keyboard to complete the transformation and press Ctrl +D (Command + D on the Mac) to get rid of the selection. You can also use the menu to remove the selection: Select/Deselect.
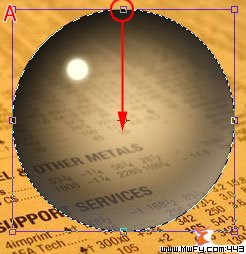
We now have to move this shadow to the right (B). Be aware that the arrow only marks the direction, not the distance.
Select the Move Tool  in your tool bar.
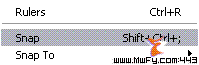
To move the selection, click on the shape and while holding the mouse button move the shape in place. Have a look at screenshot C to see where you should place this shadow. If your shadow seems to jump while you try to move it, then go to the menu and select view and make sure that Snap is turned off:
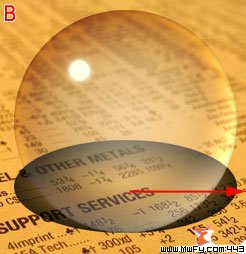
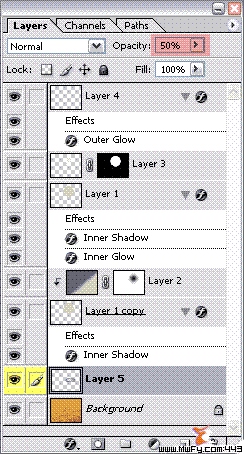
Now change the opacity of this layer to 50%. In the menu we select Filter/Blur/Gaussian Blur... and select a radius of 2 and click OK. On the right you can see how the layers palette should look like after you've done all steps (in this screenshot I marked the color of the shadow layer with yellow).

In this last step we're going to deform the image inside the glass ball. Make sure that our shadow layer (
Layer 5) is still active and
Ctrl + click (Command + click) on the
thumbnail of the layer above (the one with glass ball,
Layer 1 copy). The result is a selection in layer 5 that is based on this glass ball (like we did in step 8).
Now got to the menu and select Filter/Distort/Spherize...
Select for Amount the value 100% and make sure that Normal is selected for Mode. Click OK.
The shadow is now deformed.


Make the background layer active and press Ctrl + F (Command + F on the Mac).
Note: Ctrl + F will always apply the filter that was used previously, in our case Spherize.
That was our final step and this is the result:

In this update we're going to improve the highlight. Click on
Layer 4 that contains our highlight to make it active.
We are now going to transform the highlight by pressing
Ctrl + T (command + T on the Mac) and entering a value of
65% for
Horizontal Scale (
A) and a value of
45 for Rotation (
B) and press
enter twice:

This makes the highlight look more like an actual part of the ball:

You can make the ball even more realistic by adding more highlights or reflections. For the purpose of this tutorial I've kept it simple by adding just one single highlight.
Also be aware that once you deform the shadow or inside of the ball that you're not able to move the ball, since both deformations are of course in a way "connected" to the background. So make sure that the glass ball is in the right place, before you start with the deformations. Make sure that your background is not to plain. A real glass ball doesn't look cool either on white piece of paper in front of a white wall. Always try to use the environment to strengthen the effects you're using to make the result look more realistic.
This whole tutorial should be seen as a step in the right direction.
If you like the final result, that's fine with me, but there will always be people who want to take this a step further. My advice; buy a glass ball or collect images of glass balls. It's the best way to study highlights, shadows and reflections, which can be rather complicated at times.
I hope you enjoyed this tutorial.


