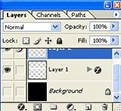
1. Begin with a new file, with black as background. Then create a new layer.
2. Then take the Rectangular Marquee Tool and draw out the size you want on your tape, then head over to the palette and chose the Channels tab and then create a new channel and fill it with white and deselect Ctrl+D.

3. Go to Filter>Pixelate>Crystallize with Cell Size 3, then press Ctrl and click the channel and go back to the layers tab and fill the selection with white.

4. Then go to Filter>Noise>Add Noise and set the Amount to 8, Distribution Uniform and Monochromatic.
5. Take the Rectangular Marquee Tool and draw out a shape as the image below shows and hit delete, do the same on the other side and deselect Ctrl+D.

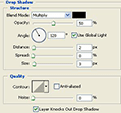
6. Head over to the layers palette and right click the layer and chose Blending Options and do this setting.

7. Change the layers Opacity to 45%. Then hold down Ctrl and click the layer, then create a new layer and take the Gradient Tool and fill it with the Linear Gradient, then hide the background layer, to do that look at the image below.

Then press Shift+Ctrl+E
And you are done!
This is what i came up with. ( Click for larger view )


