 |
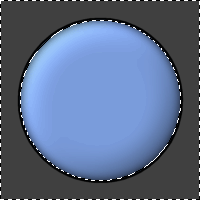
Step 1
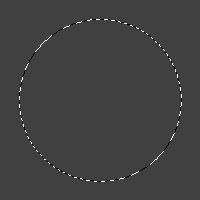
Create a new 200 by 200 pixel image, and fill the background with a dark grey (this will make it easier to work with lower contrast, it's just for convenience). Create a new Raster layer, and select a circle 160 pixels in diameter. Form the Selections menu, click Save to Alpha Channel to save your selection.
From the Selections menu, click Modify > Expand, and enter a value of 2. Fill the area with black. Now deselect ( Ctrl+D ). |
 |
Step 2
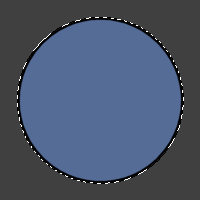
Create a new Raster layer, and load your selection ( Selections > Load from Alpha Channel ). Fill the selection with a medium-dark color (the one used here is #556C97).
From the Selections menu, click Modify > Expand, and enter a value of 2. |
Step 3
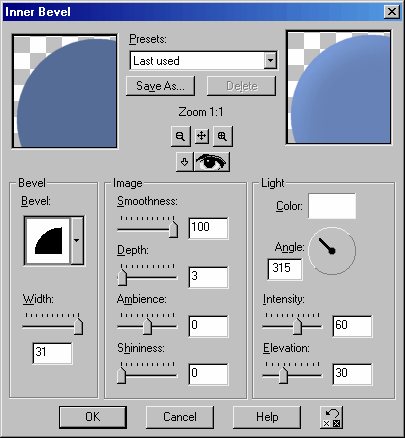
Click Effects > 3D Effects > Inner Bevel. Depending on the object, you may want to play around with the values a bit, but for this object, use the following. Repeat this step another time, so the bevel contrast is high.
 |
 |
Step 4
Deselect ( Ctrl+D ).
Click Effects > Blur > Gaussian Blur. Enter a value of 5.
Load your selection ( Selections > Load from Alpha Channel ), and invert it ( Selections > Invert ). Now press Delete to remove the 'fluff'.
Deselect ( Ctrl+D ). |
 |
Step 5
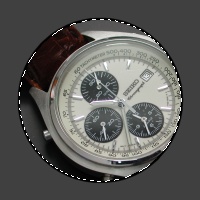
Create a new Raster layer, and load your selection ( Selections > Load from Alpha Channel ).
Now you'll have to find a photo to use for the reflection. Images of objects, architecture, and scenery work well. Use the image to fill your selected area (pattern fill). |
Step 6
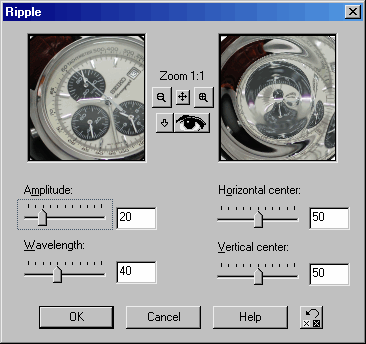
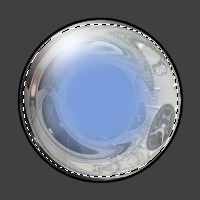
From the Selections menu, click Modify > Expand, and enter a value of 2.
Click Effects > Geometric Effects > Ripple. The values depend on the size of the image. This time, enter the following:
 |
Step 7
Deselect ( Ctrl+D ), and load the original selection ( Selections > Load from Alpha Channel ).
Click Effects > Illumination Effects > Sunburst. We apply this effect for the reflection highlight, so the "lense flare" effect won't be needed, and the rays are set to minumum:
 |
 |
Step 8
Deselect ( Ctrl+D ).
Right-click your current layer, and select Duplicate (that will be the highlight layer). Now make the layer invisible (we'll get back to it later), and return to the previous layer.
Click the Selection tool, choose Circle, and set the Feather value to 25. From the center of the image, select an area so that the feathered selection will touch the object. Now press Delete to punch out the center area. |
 |
Step 9
Set the layer's blend mode to Multiply. This is the darker reflection area. Depending on the shape of the object, you may want to change the deleted area, or tweak the blend mode. |
 |
Step 10
Now go back to the layer you've duplicated (click it to make it visible again). As in step 8, make a selection of a feathered circle. Now use the same method to select another feathered circle on the bottom-right (opposite the reflection highlight). To add the selection to the current one, press Shift while selecting. The size of the circle depends on the object, but for now, try to select a circle about the size of the circle in the image to the left.
Now press Delete to punch out the center area. |
 |
Step 11
Deselect, and change the blend mode of the layer to Luminance. |
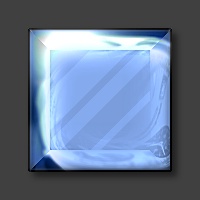 |
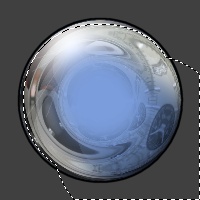
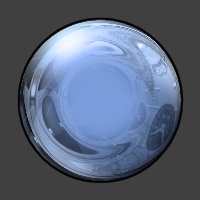
Step (!)
See if you can create this diamond-like effect using the methods in this tutorial.
(Tip: Sometimes the Dodge blend mode has a stronger effect than the Luminance mode. Also, since the object isn't a circle, try using the Punch effect to align the reflection with the edges) |