首页

PS教程

PSD素材

PS素材

背景图片

高清图片

字体下载

矢量素材

PS资源

PS作品

会员专区
注册 / 登录
收藏
入门教程照片处理抠图教程调色教程文字特效经典合成鼠绘教程滤镜特效非 主 流GIF 动画签名溶图创意设计
 您当前的位置: PhotoShop资源网 >> PS教程 >> PS教程 >> 创意设计 >> 正文

Glossy Buttons

[ 作者来源:guistuff. 编辑整理:PhotoShop资源网 更新时间: 2006-08-01 录入: 黄叶飞扬 ]


1
按此在新窗口浏览图片 Start with a new image about 400x400 pixels with a chosen background, (I'm using white). Make any kind of wacky shape for your button (for this tutorial I will show you one shape). Start by creating a new layer and using the Rectangular Marquee draw a rectangle roughly the size you want your button. See picture opposite. 
2
按此在新窗口浏览图片 Click the channels tab and create a new channel. Fill the selection in with white. You can now deselect (CTRL +D). Now go to Filter>Blur>Gaussian Blur and use a setting of about 3.5. Click OK. Next go to Image>Adjust>Levels and drag the two bottom triangles towards the center until the button looks nice and smooth (see image). Click OK when done. Hold CTRL and click on the channel "Alpha 1" to select it. Click the Layers Tab.
3
按此在新窗口浏览图片 Now fill your selection in with your chosen color (I'm using R:255 G:126 B:0), and Deselect (CTRL+D). Now to make the button more interesting go to Edit>Transform>Perspective. Drag the bottom right point inwards so that your button goes to the same shape as mine (or something similar).
4
按此在新窗口浏览图片 Now, To make the highlight, create a new layer. Using the Freeform pen 按此在新窗口浏览图片 
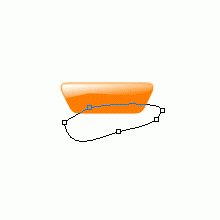
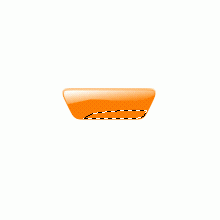
draw a rough wiggle circle around the top of the shape as seen in the picture. Once you have your path, Right click and choose "Make Selection" use default settings. Then Right click again and choose "Turn off path". Now create a new layer and fill the selection in with white.
5
按此在新窗口浏览图片 Next Hold CTRL and click on "Layer 1" to select it. Go to Select>Modify>Contract and enter 1. Now go to Select>Inverse. Make sure you have "Layer 2" active and hit delete. Now hold CTRL and click on "Layer 2" to select it then hit DELETE about 4 times to completely get rid of the white. Do Not lose the selection.
6
按此在新窗口浏览图片 Now press D then X to reset the colors. Using the Linear Gradient in the options tab change the gradient to "Foreground to transparent" and drag the gradient from the top of the selection to the bottom. You should now get a highlight effect.
7
按此在新窗口浏览图片 You have the highlight, now you need the dark shadow. Do the same as before, using the freeform pen draw a wiggly line across the bottom of your button (see picture). Again, right click and choose "Make selection", use default settings, right click, and choose "Turn off path". Now create a new layer -- don't lose that selection.
8
按此在新窗口浏览图片 This time fill the selection in with black On a new layer. Hold CTRL and click on "Layer1" to select it. Go to Select>Modify>Contract and enter 1 then go to Select>Inverse and with "layer 3" active in the layers palette hit delete. Now hold CTRL and click on "layer 3" to select it, hit DELETE about 4 times to remove all the black -- do NOT lose the selection.
9
按此在新窗口浏览图片 Now set black as your foreground color, and using a the linear gradient at foreground to transparent still, drag from the bottom of the selection to the top. Then Deselect (CTRL+D). Now you may want to blur the black shadow a little Filter>Blur>Gaussion Blur, I used a setting of 3.0, then I lowered the layers opacity down to 42. Now you are done with the button add a Drop Shadow to "layer 1" Layer>Effects>Drop shadow.
10
按此在新窗口浏览图片 When you add text make it the same color as the button but a lot darker. To make it look insert duplicate the text layer by dragging it to the create a new layer. Drag it below the first text layer and make the duplicate text the color White. Using the move tool move it up a pixel and left a pixel, Set the layer blend mode to "Color Dodge" go to Layer>Type>Render Layer and Filter>Blur>Guassion Blur. I used 1.0. Now turn the bottom text layers opacity down to about 50 and your done.
11
按此在新窗口浏览图片 Don't stop there, make some whacky shapes and see the cool effects you get. Just experiment and see


≡★ 免 责 声 明 ★≡

除本站原创外,本站所提供的所有教程均收集整理自网络,其版权归该教程直原始作者或原始出处所有!

除特别声明外,您可以在保持教程的完整和注明来源的前提下免费复制、转贴本站所提供的所有教程;但是,不可以盗链本站的图片!

除特别声明外,在未经许可的情况下您不得将本站所提供的任何教程(包括资源)用于商业用途;

如果确有需要,请自行与该教程的原始所有权者(即:原始作者或出处)联系,本站不提供相关服务;否则,由此而引发的一切后果由您自负!