| Sure, you could take the easy way out and use a plug-in (like Eyecandy) to add fire effects to your text, but come on. That's so 1996. In this tutorial I'll show you a way to make quality fire text from scratch. |
|
 |
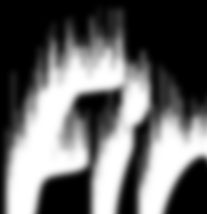
 Start by opening Photoshop and creating a new grayscale image. Go File»New and change the mode to grayscale. For this example, I chose dimensions of 400x400 pixels. In the channels palette create a new channel by clicking the Start by opening Photoshop and creating a new grayscale image. Go File»New and change the mode to grayscale. For this example, I chose dimensions of 400x400 pixels. In the channels palette create a new channel by clicking the  . Then use the Text Tool to add white text to your channel. When you are finished, hit Ctrl+D to deselect your text. To make things easier, double click your new channel in the channels palette and rename it "Base." . Then use the Text Tool to add white text to your channel. When you are finished, hit Ctrl+D to deselect your text. To make things easier, double click your new channel in the channels palette and rename it "Base."
|
 |
 Drag the "Base" channel to the to duplicate it. Go to Image»Rotate Canvas»90° CW. Then apply the wind filter by going to Filter»Stylize»Wind Choose the settings Blast and From the Left. Reapply the filter according to how tall you want your flames to be. I used the filter a total of three times in my example. Drag the "Base" channel to the to duplicate it. Go to Image»Rotate Canvas»90° CW. Then apply the wind filter by going to Filter»Stylize»Wind Choose the settings Blast and From the Left. Reapply the filter according to how tall you want your flames to be. I used the filter a total of three times in my example.
|
 |
 Now rotate your text back to normal by going Image»Rotate Canvas»90° CCW. Soften the streaks by using Filter»Blur»Gaussian Blur Pick a setting that looks good to you. I chose 3.0 pixels. Now rotate your text back to normal by going Image»Rotate Canvas»90° CCW. Soften the streaks by using Filter»Blur»Gaussian Blur Pick a setting that looks good to you. I chose 3.0 pixels.
|
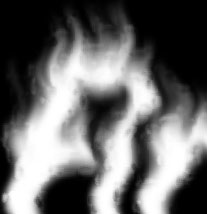 |
 Lengthen the flames by going Filter»Blur»Motion Blur Set the distance to 20 pixels and the angle to -79° or so. Then go Filter»Distort»Wave to add some waviness. I chose these settings. Next go Filter»Distort»Ocean Ripple to add some texture to your flame. Set the Ripple Size to 15 and the Ripple Magnitude to 2. Lengthen the flames by going Filter»Blur»Motion Blur Set the distance to 20 pixels and the angle to -79° or so. Then go Filter»Distort»Wave to add some waviness. I chose these settings. Next go Filter»Distort»Ocean Ripple to add some texture to your flame. Set the Ripple Size to 15 and the Ripple Magnitude to 2.
|
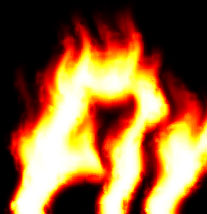 |
 Now you need to copy the contents of the "Base copy" channel into Layer 1. This can be accomplished with the following series of impressive keyboard shortcuts: Ctrl+A, Ctrl+C, Ctrl+1, Ctrl+V. Now it's time to colorize the image. Go to Image»Mode»Indexed Color. Then go Image»Mode»Color Table and choose Black Body. Next switch back to RGB Mode by going Image»Mode»RGB Color. Now you need to copy the contents of the "Base copy" channel into Layer 1. This can be accomplished with the following series of impressive keyboard shortcuts: Ctrl+A, Ctrl+C, Ctrl+1, Ctrl+V. Now it's time to colorize the image. Go to Image»Mode»Indexed Color. Then go Image»Mode»Color Table and choose Black Body. Next switch back to RGB Mode by going Image»Mode»RGB Color.
|
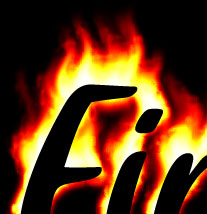 |
 Now select the "Base" channel by going to the Channels Palette and Ctrl+clicking the "Base" channel. Then return to the Layers Palette and click the to create a new layer. Fill the selection with black (It can quickly be done by pressing D followed by Alt+Backspace). Now select the "Base" channel by going to the Channels Palette and Ctrl+clicking the "Base" channel. Then return to the Layers Palette and click the to create a new layer. Fill the selection with black (It can quickly be done by pressing D followed by Alt+Backspace).
|
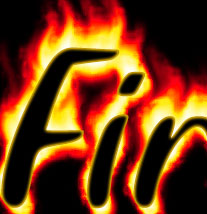 |
 As a final touch you may want to add an inner glow to your text to make it blend in with the fire a little smoother. Right click on the black text's layer and choose Blending Options. Then pick Inner Glow and play with the settings. If you would like to change the color or adjust it a little, click the background layer (the one with the flames) in the Layer Palette and explore the Image»Adjust»Hue/Saturation and Image»Adjust»Curves. You can click the image to the left to see the full view. Whewww, that's one hot tamale! As a final touch you may want to add an inner glow to your text to make it blend in with the fire a little smoother. Right click on the black text's layer and choose Blending Options. Then pick Inner Glow and play with the settings. If you would like to change the color or adjust it a little, click the background layer (the one with the flames) in the Layer Palette and explore the Image»Adjust»Hue/Saturation and Image»Adjust»Curves. You can click the image to the left to see the full view. Whewww, that's one hot tamale!
|


