Open Photoshop and make a new document with these settings
Width 30 pixel
Height 20 pixel
Background color: white.
We’re going to draw an icon battery so we need to work with small dimensions. To facilitate your work before starting you need to set up your grid settings.
Go Edit > Preferences > Guides Grid & Slices and follow these settings.

Once you have done go to View > Show > Grid and check View > Extras (this is to show your grid)
Now set the pencil tool (B), click B to select the tool the use these settings
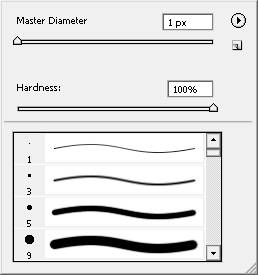
Master Diameter 1px, Hardness 100%. Every click on your canvas will generate a solid 1px * 1px shape.
As foreground color choose #003399 (be use that “only web colors” is unchecked). This color is quite adapted to imitate a mobile battery color.
Click (Z) to select zoom tool right click then choose “fit on screen”, now you should have a 1600% zoom of your image.
Start dragging your shape following this image. Note, do not cap your shape now.. we need to know first where our last charge icon will fall.
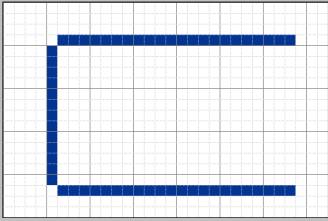
Continue drawing the battery
Create a new layer go Layer > New > Layer : )
Rename the layer charge.
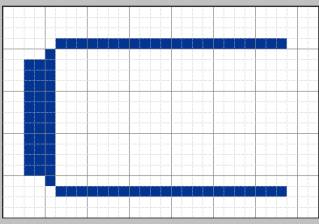
Be sure that “charge” layer is still select and with the pencil tool (B) draw a shape like in picture.

Note, if you make a mistake do NOT use the erase tool.. simply set your pencil foreground color to white and click over the pixels that you want to remove.
Let’s give some “depth” to our battery level. The main battery has been hidden for show this step.
Well, starting from the top the moving to the right draw over your shape with these colors.
Line 1:foreground color of the pencil: #0066CC
Line 2: #99CCFF
Line 3: #CCCCFF
Line 4: #6699FF
Line 5: #3366CC
Do not change the others.
Then staring from the bottom the second line color is #3366CC, the result .