| The following tutorial is courtesy of "Mac Design Magazine" |
 Photographic edge effects have long been one of the classic Photoshop tricks you can apply to photos to give them that extra something to make them really stand out in a design or layout. This type of effect is so popular that it¡¯s almost a genre unto itself, with different companies offering software with the sole purpose of creating cool edges.
To begin our journey of styled photo edges, we¡¯ll create a gently billowing photo that looks as if it¡¯s blowing in the soft breezes of summer. Next, we¡¯ll go over the classic way to create photo edges using only a layer mask and a selection of Photoshop¡¯s filters (along with a dash of the Liquify filter thrown in for good measure). Finally, we¡¯ll show you how to borrow textures and details from other photos to fashion a custom photo edge.
|
|
| STEP 1 |
|
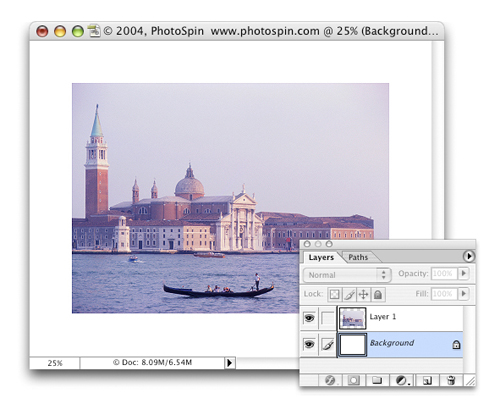
| This technique creates an effect that makes an image look as if it¡¯s a piece of fabric blowing in the breeze or floating under water. First, choose Layer>New>Layer Via Copy (Command-J [PC: Control-J]) to make a copy of your image on a new layer. Then, make the Background layer active and fill it with white. A quick way to do this is to make white your Foreground color and press Option-Delete (PC: Alt-Delete). Choose Image>Canvas Size and add a generous amount of white canvas around your image as shown here (we added 200 pixels on all sides). |
|
|
| STEP 2 |
|
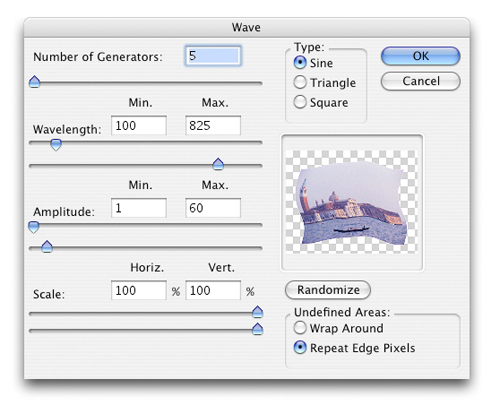
| Click on Layer 1 (the image layer) to make it active. From the Filter menu, choose Distort>Wave. In the Wave dialog, select Sine for the Type and set the Number of Generators to 5. Set Wavelength to Minimum 100, Maximum 825; Amplitude to Minimum 1, Maximum 60; and both Horizontal and Vertical Scale at 100%. The actual effect you get will vary depending on image size and the random nature of the Wave filter, but these settings are a good starting point for a gentle swaying or billowing effect. Click OK to apply the Wave filter. |
|
|
| STEP 3 |
|
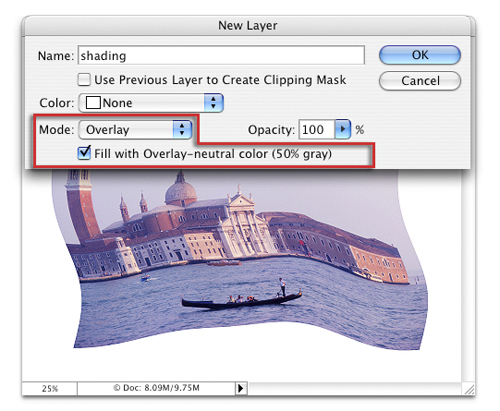
| From the main Layer menu, choose New>Layer. In the New Layer dialog, name the layer ¡°shading,¡± set the Mode to Overlay, and then click the Fill with Overlay-Neutral Color (50% gray) checkbox. Click OK. Since the Overlay blend mode doesn¡¯t ¡°see¡± 50% gray, this will create a gray layer that initially will have no visible effect on the image. We¡¯ll use this to add some shading to our billowing image. |
<!-- BEGIN ADVERT_SQFLOAT -->
<!-- END ADVERT_SQFLOAT -->
|
|
| STEP 4 |
|
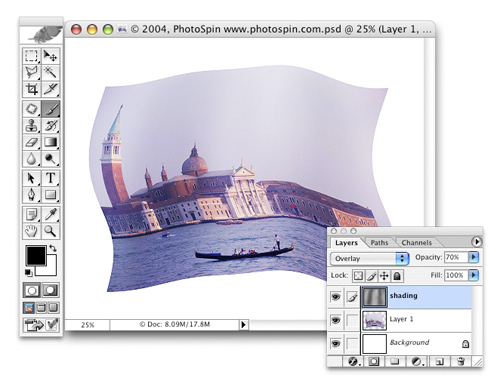
| Make the Brush tool active and choose a large, soft-edged brush (we used a 300-pixel brush; the size of the brush you use will depend on the pixel dimensions of your image). Set the Brush opacity to a low value such as 10% and, with black as the Foreground color, paint in where you want to add shading to the image. Here, we chose to add shading where it looked as if the image was billowing inwards. This left the image lighter in the areas where it seemed to be billowing up and closer to the light source. |
Filtered Layer Mask Edges
|
|
| STEP 1 |
|
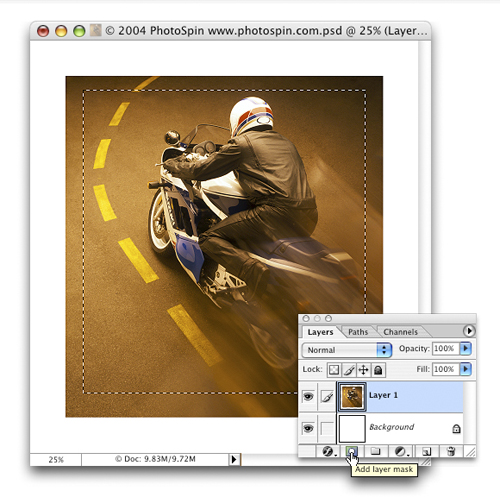
| Follow the procedure in Step 1 of the previous technique to make a copy layer of your image, fill the background with white, and add some extra canvas size to the image. Choose the Rectangular Marquee tool and draw a selection box around your image as shown. The area inside the selection will be the main image area and the area outside will have an edge effect applied to it. Click the Add Layer Mask icon at the bottom of the Layers palette to add a layer mask to Layer 1. The area that wasn¡¯t selected will be masked off. |
|
|
| STEP 2 |
|
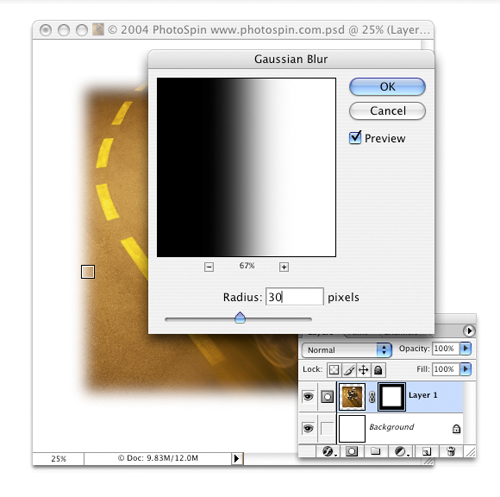
| Make sure that the layer mask is the active element in the Layers palette (look for the Mask icon next to the Eye icon for that layer). From the Filter menu, select Blur>Gaussian Blur and add a 30¨C50-pixel blur to the layer mask. The amount of blur you use will vary depending on image size, but we just want to soften the edges and add some gray values for subsequent filter effects. If all you want for your image is a soft-edged frame, then this step will do that for you. |
|
|
| STEP 3 |
|
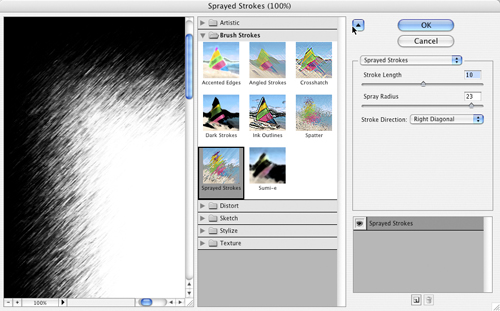
With the layer mask still active, choose Filter>Brush Strokes>Sprayed Strokes. Adjust the Stroke Length and the Spray Radius to stylize the edge of the layer mask to your taste (we used 10 and 23, respectively). Click OK.
In this example, we used Sprayed Strokes, but you can use many of the artistic, sketch, and brush strokes filters to create roughened edges for customized edge effects. (Trying them all is a great activity for when you have insomnia!) |
|
|
| STEP 4 |
|
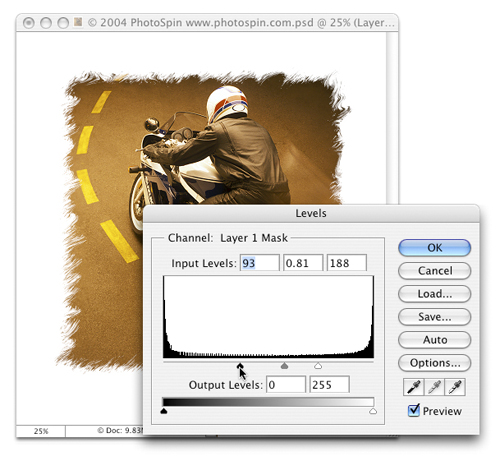
| Go to Filter>Liquify and use the Forward Warp or the Turbulence tool to brush along the edges of the mask and further customize the frame. There are no specific settings for this; just ¡°vandalize¡± the edges a bit until you get something you like. After the Liquify filter, choose Image>Adjustments>Levels and move the left and right Input Levels sliders closer together to adjust the contrast and sharpness of the edge effect. |
Custom Edges from Other Photos
|
|
| STEP 1 |
|
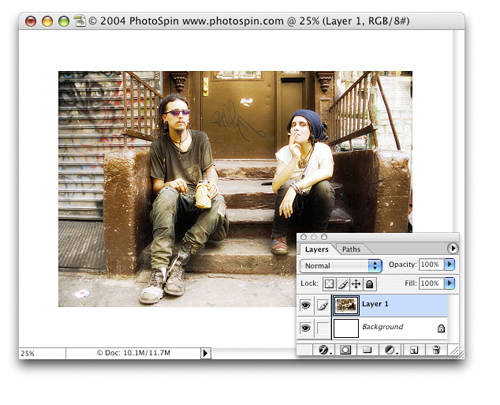
| This technique is a variation on one that Scott Kelby demonstrated at PhotoshopWorld in San Francisco. It uses high-contrast detail in other photos to create a custom rough edge, similar to the effect of peel-apart Polaroid images. Whereas Scott used different images for all four sides of his edge, we¡¯re going to use a single image and apply it a bit differently, but the basic concept is the same. As with the previous techniques in this article, start with your image on a separate layer above a white background and add a little extra canvas size. |
|
|
| STEP 2 |
|
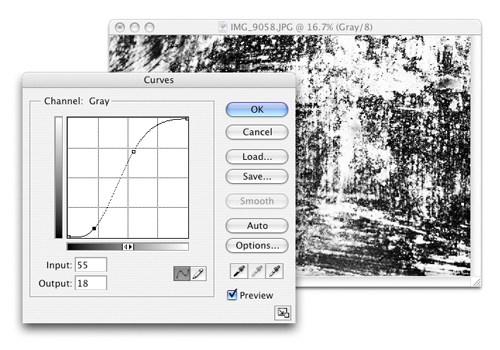
| Open up an image that has rough detail or texture and that¡¯s slightly larger than your photo image. Details of craggy rock texture, old wood, rusted metal, or similar subjects will all work. The image we¡¯re using is a close-up of a bad paint job on an old propane tank. Convert to Grayscale (Image>Mode>Grayscale) and apply a Curves adjustment by pressing Command-M (PC: Control-M) to increase contrast. |
|
|
| STEP 3 |
|
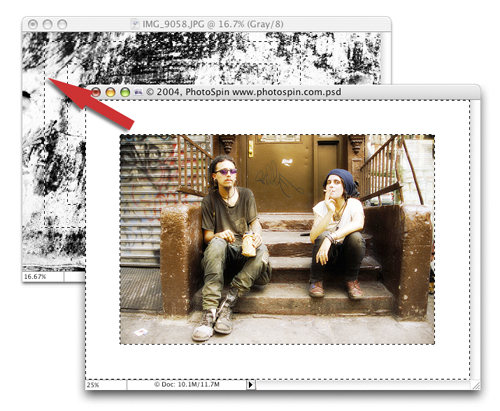
| Switch to your main image and load a selection of the photo layer by Command-clicking (PC: Control-clicking) its thumbnail in the Layers palette. Choose Select>Inverse to select the area around the photo. With a selection tool such as the Rectangular Marquee active, place the cursor inside the selected area and drag the selection over onto the textured source image. Position the selection in the high-contrast textured file so you can copy the detail you want. Choose Edit>Copy or Command-C (PC: Control-C). |
|
|
| STEP 4 |
|
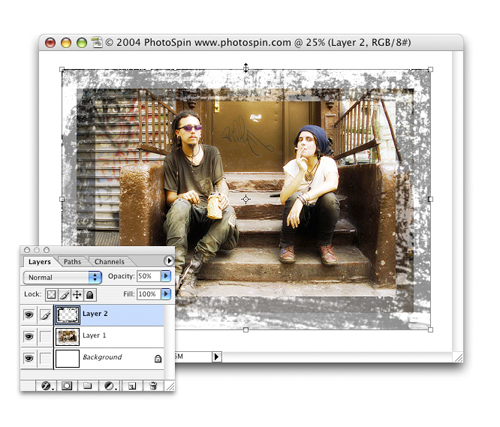
| Switch back to your main image and choose Edit>Paste to add the copied textured frame as a new layer. Lower the opacity of the textured frame layer to 50% so you can see the edges of the photo underneath. Use Free Transform (Edit>Free Transform) to scale the frame so it fits the image with a little overlap, as shown here. Press Enter to apply the transformation and 0 (zero) to return the layer to 100% opacity. |
|
|
| STEP 5 |
|
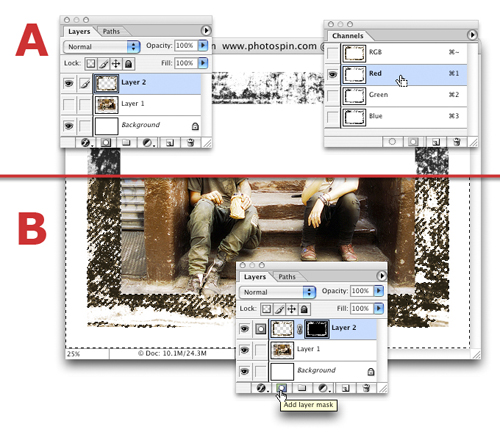
| Turn off the visibility of the photo layer so that all you can see are the textured frame and the white background. In the Channels palette (Window>Channels), load a selection of one of the channels (it doesn¡¯t matter which one; we chose the Red channel) by Command-clicking (PC: Control-clicking) on it (A). Turn the photo layer back on by clicking its Eye icon and then make the textured frame layer active. Option-click (PC: Alt-click) on the Add Layer Mask icon at the bottom of the Layers palette to mask the white areas of the textured frame. This lets some of the image underneath show through into those areas of the frame (B). |
|
|
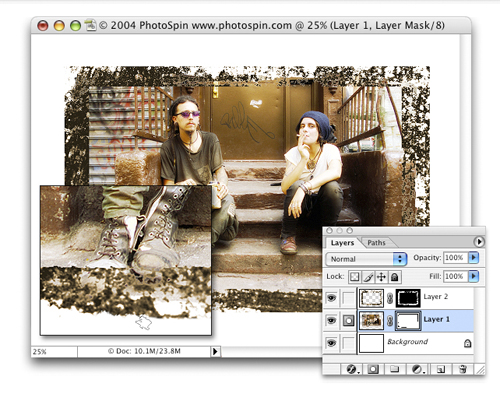
| STEP 6 |
|
| Make the photo layer active and click on the Add Layer Mask icon at the bottom of the Layers palette to add a layer mask. Choose one of the rough brushes (we used Chalk 23 pixels and then used the size slider in the Brush Picker to increase the size of the brush), set black as your Foreground color, and click in spots to etch away some of the visible horizontal and vertical edges of the photo. You can also use this technique on the layer mask for the textured frame layer to further roughen it up if you feel it needs it. |