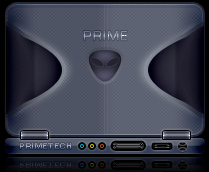
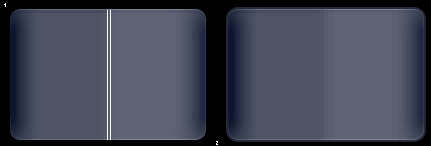
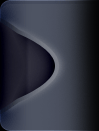
Step 1 Start out with a 400x300 black background canvas. First create a layer set and name it Laptop, You need to put all of the layers in this layer set. Select the round rectangle tool, set the radius to 10px and draw a #535969 round rectangle. Size does not matter as long as its realistic.

 Step 2
 Add the following layer style settings:
Inner Shadow:
- Blend Mode: Color Burn
+ Color: #272E43
- Opacity: 5
- Angle: 90
+ Use Global Light: Unchecked
- Distance: 4
- Choke: 0
- Size: 0
- Contour: Default
+ Anti-aliased: Checked
- Noise: 0
Satin:
- Blend Mode: Color Burn
+ Color: #282735
- Opacity: 85
- Angle: 0
- Distance: 6
- Size: 27
- Contour: Default
+ Anti-aliased: Uncheck
+ Invert: Uncheck
|
Inner Glow:
- Blend Mode: Color Dodge
- Opacity: 28
- Noise: 0
+ Color: #FFFFFF
- Technique: Softer
- Source: Edge
- Choke: 0
- Size: 1
- Contour: Default
+ Anti-aliased: Uncheck
- Range: 25
- Jitter: 0
Gradient Overlay:
- Blend Mode: Normal
- Opacity: 6
- Gradient: Default
+ Reverse: Uncheck
- Style: Linear
+ Align with Layer: Check
- Angle: 0
- Scale: 10
|
Stroke:
- Size: 2
- Position: Outside
- Blend Mode: Normal
- Opacity: 100
- Fill Type: Color
+ Color: #272634

|
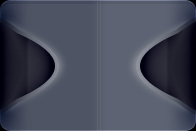
Step 3 In a new layer, draw two lines in the middle of the screen. Set opacity level to 5%.
 Step 4
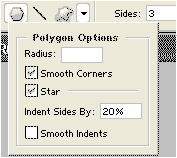
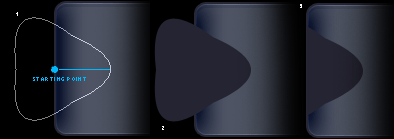
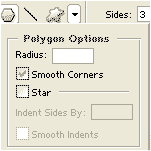
 Set the foreground color to #252432. Select the Polygon tool then select fill pixel at the top, set the sides to 3 and the polygon option to match with the picture guide below. When drawing the shape, hold shift and click on the first point which will be the center edge of the shape. While holding shift and the first point in place, drag your mouse to the right. Remember this will be a #252432 colored shape. Cut out the pieces thats outside the screen.

 Step 5
 Add the following layer style settings:
Drop Shadow:
- Blend Mode: Normal
+ Color: #FFFFFF
- Opacity: 29
- Angle: 180
+ Use Global Light: Unchecked
- Distance: 7
- Spread: 0
- Size: 8
- Contour: Default
+ Anti-aliased:Unchecked
- Noise: 0
|
Satin:
- Blend Mode: Color Burn
+ Color: #282735
- Opacity: 67
- Angle: 0
- Distance: 7
- Size: 27
- Contour: Default
+ Anti-aliased: Uncheck
+ Invert: Uncheck
Gradient Overlay:
- Blend Mode: Normal
- Opacity: 6
- Gradient: Default
+ Reverse: Uncheck
- Style: Linear
+ Align with Layer: Check
- Angle: 0
- Scale: 10
|
Stroke:
- Size: 4
- Position: Outside
- Blend Mode: Normal
- Opacity: 31
- Fill Type: Gradient
- Gradient: Default
+ Reverse: Check
- Angle: 180
- Scale: 100
 |
Step 6 Create a new layer and duplicate the previous shape you just made, Merge the new layer and the duplicate. Now rotate and position on the other side of the screen. Why did we do this? If you just duplicated the previous shape with all of the layer styles in tack, you would have to re-edit some of the settings.
 Step 7
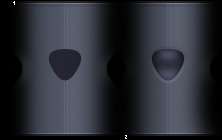
 In a new layer were going to make a similar alienware type logo, for copyright reason the logo wont be exact. Use the same technique as step 4 when creating the shape. Apply the following layer styles:
Inner Shadow:
- Blend Mode: Multiply
+ Color: #000000
- Opacity: 75
- Angle: 90
+ Use Global Light: Unchecked
- Distance: 1
- Choke: 0
- Size: 8
- Contour: Default
+ Anti-aliased: Unchecked
- Noise: 0
 |
Satin:
- Blend Mode: Linear Dodge
+ Color: #2D2C39
- Opacity: 100
- Angle: -90
- Distance: 21
- Size: 8
- Contour: Default
+ Anti-aliased: Uncheck
+ Invert: Uncheck
 |
Stroke:
- Size: 3
- Position: Outside
- Blend Mode: Normal
- Opacity:10
- Fill Type: Gradient
- Gradient: Default
+ Reverse: Uncheck
- Angle: -90
- Scale: 100 |
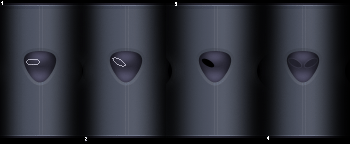
Step 8 In a new layer use the Ellipse tool to make the eyes of the alien head logo. Rotate through Edit > Transform, Fill path #252432 and finish it off with a stroke layer style. Duplicate the first eye to make the other eye. See picture guide for visuals.
Stroke:
- Size: 1
- Position: Outside
- Blend Mode: Normal
- Opacity: 6
- Fill Type: Color
+ Color: #FFFFFF
|
 |
Step 9 To make the back side panel use the round rectangle tool with a radius of 6 px and color code #5C6271. Apply this layer style settings:
Inner Shadow:
- Blend Mode: Color Burn
+ Color: #272E43
- Opacity: 24
- Angle: -90
+ Use Global Light: Unchecked
- Distance: 8
- Choke: 0
- Size: 0
- Contour: Default
+ Anti-aliased: Checked
- Noise: 0 |
Inner Glow:
- Blend Mode: Color Dodge
- Opacity: 15
- Noise: 0
+ Color: #FFFFFF
- Technique: Softer
- Source: Edge
- Choke: 0
- Size: 1
- Contour: Default
+ Anti-aliased: Uncheck
- Range: 25
- Jitter: 0 |
Satin:
- Blend Mode: Color Burn
+ Color: #282735
- Opacity: 100
- Angle: 0
- Distance: 5
- Size: 16
- Contour: Default
+ Anti-aliased: Uncheck
+ Invert: Uncheck |
 Step 10
 Same as the last step, use the round rectangle tool to make the piece that connects the back side panel to the screen. This time set the radius setting to 2px, #7F838D for the color and this layer style settings:
Inner Shadow:
- Blend Mode: Color Dodge
+ Color: #FFFFFF
- Opacity: 100
- Angle: 90
+ Use Global Light: Unchecked
- Distance: 1
- Choke: 0
- Size: 6
- Contour: Default
+ Anti-aliased: Unchecked
- Noise: 0 |
Outer Glow:
- Blend Mode: Normal
- Opacity: 26
- Noise: 0
+ Color: #FFFFFF
- Technique: Precise
- Spread: 0
- Size: 3
- Contour: Default
+ Anti-aliased: Uncheck
- Range: 50
- Jitter: 0 |
Satin:
- Blend Mode: Normal
+ Color: #22212E
- Opacity: 100
- Angle: 90
- Distance: 3
- Size: 2
- Contour: Default
+ Anti-aliased: Uncheck
+ Invert: Uncheck |
 Step 11
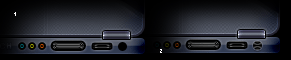
 Now for the connectors, first the plug for the speakers, mic etc. Select the Ellipse tool with a black foreground. Draw a small circle and apply this layer styles. To get different colors, just edit the satin color setting. Here are my other color codes: Orange type: #FF6600 ' Yellow type: #FCFF00.
Outer Glow:
- Blend Mode: Normal
- Opacity: 100
- Noise: 0
+ Color: #FFFFFF
- Technique: Softer
- Spread: 0
- Size: 5
- Contour: Default
+ Anti-aliased: Uncheck
- Range: 50
- Jitter: 0 |
Satin:
- Blend Mode: Normal
+ Color: #00E4FF
- Opacity: 100
- Angle: -90
- Distance: 1
- Size: 0
- Contour: Default
+ Anti-aliased: Uncheck
+ Invert: Uncheck |
Stroke:
- Size: 2
- Position: Outside
- Blend Mode: Normal
- Opacity: 100
- Fill Type: Color
+ Color: #000000 |
 Step 12
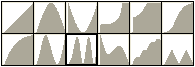
 To make the plug for the printer, monitor etc use the round rectangle tool with a radius of 4 px and black as the color. Draw two round rectangle shape in different layers and apply the same outer glow and stroke layer styles settings as step 11 but this satin settings:
Satin:- Blend Mode: Normal
+ Color: #7D7D7D
- Opacity: 100
- Angle: -90
- Distance: 1
- Size: 5
- Contour:
Picture below+ Anti-aliased: Uncheck
+ Invert: Uncheck
 Step 13
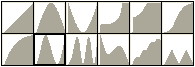
 To make make the adapter plug use the ellipse tool. Same outer glow and stroke setting as step 11 but this satin settings:
Satin:- Blend Mode: Normal
+ Color: #7D7D7D
- Opacity: 21
- Angle: -90
- Distance: 6
- Size: 3
- Contour:
Picture below+ Anti-aliased: Uncheck
+ Invert: Uncheck
 Step 14
 Add some text on the back of the screen and the back side panel. The font i used are eurostile for the back of the screen and small font for the back panel. Apply the layer style settings below to your font to blend with the laptop. Once you have all of the elements together, duplicate the layer set and merge. Go to Edit > Transform > Flip Vertical and set it apart from the original about 3px. Take a soft eraser brush, preffered a big one and erase the bottom part to make a reflection effect.
Gradient Overlay:
- Blend Mode: Normal
- Opacity: 31
- Gradient: Default
+ Reverse: Check
- Style: Reflected
+ Align with Layer: Check
- Angle: 90
- Scale: 88 |
Stroke:
- Size: 1
- Position: Outside
- Blend Mode: Color Burn
- Opacity: 12
- Fill Type: Gradient
- Gradient: Default
+ Reverse: Check
- Angle: 90
- Scale: 100 |