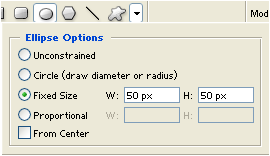
Step 1 Start out with a 400 x 300 black canvas, size does not matter as long as its bigger than 100 x 100 px. Select the Elipse tool and pull down the Elipse option. Have this settings:
 Step 2 Create
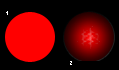
 a new Layer set and a new layer inside the layer set. First we have to make the round object in this case the color is going to be red, use this color code #FF0000. While the ellipse tool is selected, foreground color is set to #FF0000 and the settings above entered, click your right mouse to auto create a 50x 50x circle. Then edit the following layer styles:
Gradient Overlay:
- Blend Mode: Linear Burn
- Opacity: 87
- Gradient: Default
+ Reverse: check
Style: Radial
+ Align with layer: Check
- Angle: 90
- Scale: 107
|
Stroke:
- Size: 1
- Position: Outside
- Blend Mode: Normal
- Opacity: 17
- Fill type: Gradient
- Gradient: Default
+ Reverse: Check
- Style: Linear
+ Align with layer: Check
- Angle: 117
- Scale: 100
|
 Step 3 Create
 a new layer, while the Ellipse tool is selected pull down the Ellipse option and check Unconstrained instead of fixed size. Were now going to make a thin circle, see picture guide. Once you create the flat circle using the ellipse tool, add this layer styles setting:
Inner Shadow:
- Blend Mode: Color Burn
+ Color: #000000
- Opacity: 47
- Angle: -90
+ Use Global Light: Unchecked
- Distance: 1
- Choke: 0
- Size: 2
- Contour: Default
+ Anti-aliased: Unchecked
- Noise: 0
|
Gradient Overlay:
- Blend Mode: Normal
- Opacity: 56
- Gradient: Default
+ Reverse: check
- Style: Reflected
+ Align with layer: Check
- Angle: 0
- Scale: 90
|
 Step 4
 Select the Round Rectangle Tool and change radius setting to 2px. In a new layer, create a small round rectangle smaller than the flat circle with a wider height. See picture guide for visuals. Apply this layer style settings:
Inner Shadow:
- Blend Mode: Normal
+ Color: #000000
- Opacity: 75
- Angle: -90
+ Use Global Light: Unchecked
- Distance: 2
- Choke: 0
- Size: 4
- Contour: Default
+ Anti-aliased: Unchecked
- Noise: 0
|
Gradient Overlay:
- Blend Mode: Normal
- Opacity: 63
- Gradient: Default
+ Reverse: Check
- Style: Reflected
+ Align with layer: Check
- Angle: 0
- Scale: 94
|
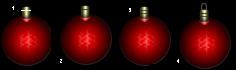
 Step 5 Create
 a new layer, select the Pencil tool with foreground color of #FFFFFF. Draw a line across the last shape you draw then apply the same layer styles setting as step 4. Duplicate the line layer and position it above or below the original line. Set-up the two lines like you see on the picture guide below. Now to make it complete, create a new layer then select Elliptical Marquee Tool with foreground color #505050, Draw a small circle, this will be the piercing that hangs in the tree.
<!-- google_ad_section_end -->


