Step 1 Start out with a 300 x 200 #263B4E canvas. First create a new layer set then set the blending mode to Hard Light.
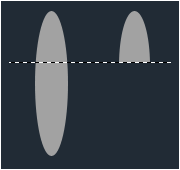
Create a new layer and use the Ellipse tool to make the oblong shape you see below.
 Step 2
 Adding silver texture and perspective detail require editing the following layer styles. Hopefully by now you know where to acess the layer style panel.
Bevel and Emboss:
- Style: Inner Bevel
- Technique: Chisel Hard
- Depth: 1000
- Direction: Down
- Size: 1
- Soften: 0
- Angle: 90
- Use Global Light: Uncheck
- Altitude: 60
- Gloss Contour: Default
- Anti-aliased: Uncheck
- Highlight Mode: Normal
+ Color: #000000
- Opacity: 100
- Shadow Mode: Normal
+ Color: #000000
- Opacity: 100
|
Satin:
- Blend Mode: Normal
+ Color: #000000
- Opacity: 100
- Angle: 0
- Distance: 3
- Size: 9
- Contour: Default
- Anti-alised: Check
- Invert: Unheck
|
Gradient Overlay:
- Blend Mode: Normal
- Opacity: 100
- Gradient: Default
- Reverse: Check
- Style: Reflected
- Align with Layer: Check
- Angle: 0
- Scale: 123
|
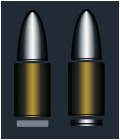
 Step 3
 To make the case, use the Rounded Rectangle Tool with Fill pixel selected and radius of 2 px to draw the shape you see below. It doesn't matter what color you use since it will be covered by the gradient overlay colors. Make sure you create every element of the bullet in a different layer located in the layer set you created earlier.
 Step 4
 Edit the same layer styles as the slug with slight modifications.
Note: Instead of having to re-enter every setting changes, you can right click on the slug layer name in layers panel and select duplicate layer style. Just edit the new settings fit for the case.
Bevel and Emboss:
- Style: Inner Bevel
- Technique: Chisel Hard
- Depth: 1000
- Direction: Down
- Size: 1
- Soften: 0
- Angle: 90
- Use Global Light: Uncheck
- Altitude: 60
- Gloss Contour: Default
- Anti-aliased: Uncheck
- Highlight Mode: Normal
+ color: #000000
+ Opacity: 100
- Shadow Mode: Normal
+ Color: #000000
+ Opacity: 0
|
Satin:
- Blend Mode: Normal
+ color: #00000
- Opacity: 100
- Angle: 0
- Distance: 3
- Size: 9
- Contour: Default
- Anti-alised: Check
- Invert: Unheck
|
Gradient Overlay:
- Blend Mode: Normal
- Opacity: 100
- Gradient: Picture below
- Reverse: Check
- Style: Reflected
- Align with Layer: Check
- Angle: 0
- Scale: 123
|
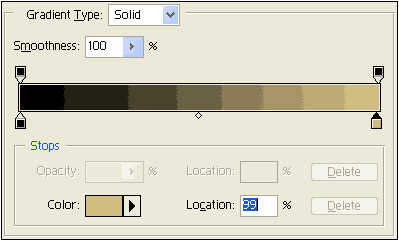
Gradient colors: #000000 ' #D4C084
 Step 4
 Now were going to make the Extractor Groove which is found between the case and the case trim. It's not necessary to include this piece but I like to put a great deal of details in all of my projects. To make the Extractor Groove, use the same method as step 3. Just remember the width of the shape is a little smaller than the case. Layer styles should be similar to the case but the gradient color should be default, black and white.
 Step 5
 The Case trim is not really necessary but it gives it more depth. To make this piece, repeat step 3 and 4 but the shape is smaller and little wider than the Extractor Groove. See picture guide below.
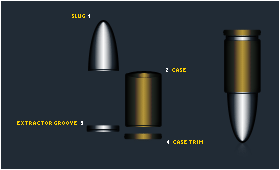
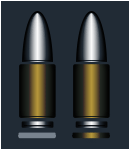 Step 6
 Now that you have all the parts just put them together.
 Tricks
 If you want to place this bullet in a different background, All you have to do is duplicate the layer set then go to Layer > Merge Layer Set. Now that you have an extra bullet in one layer, Go to Select > Load Select > Default to select the whole bullet. While the whole bullet is selected create a new layer and fill it with #263B4E. Place this layer below the original layer set OR the one layered bullet, whichever you want to use. Just make sure you dont have the layer set and the one layered bullet on at the same time.


