step 17
|
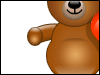
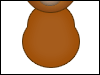 Now it's time to style it up! Give it a Stroke, a Color Overlay, and an Inner Shadow. Product. Now it's time to style it up! Give it a Stroke, a Color Overlay, and an Inner Shadow. Product. |
| step 18 |
|
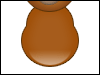 (New layer => “body shine”) Give layer “body” a shine with a width of 42px and a height of 31px (positioned towards the bottom of the body: Image.) and an Layer Opacity of 50%. (New layer => “body shine”) Give layer “body” a shine with a width of 42px and a height of 31px (positioned towards the bottom of the body: Image.) and an Layer Opacity of 50%. |
| step 19 |
|
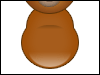 (New layer => “body shadow”) Using a selection of the same size as the previous circle selection (just keep the same Fixed Size settings for the Elliptical Marquee Tool), Give layer “body” a shine towards the middle of the body ( image), but instead of using white for the gradient, use your “Dark Brown” Color. Product. (New layer => “body shadow”) Using a selection of the same size as the previous circle selection (just keep the same Fixed Size settings for the Elliptical Marquee Tool), Give layer “body” a shine towards the middle of the body ( image), but instead of using white for the gradient, use your “Dark Brown” Color. Product. |
| step 20 |
|
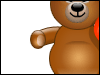
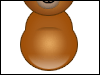 (New layer => “body gloss”) Give layer “body” a gloss with a Layer Opacity of 100%. Product. (New layer => “body gloss”) Give layer “body” a gloss with a Layer Opacity of 100%. Product. |
| step 21 |
|
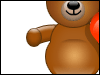
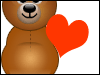 (New layer => “valentine”) Here's the fun part (New layer => “valentine”) Here's the fun part  Custom Shape Tool with these settings Make a shape that looks like mine (Remember to hold SHIFT while you're making the shape to keep it proportional). Image. Now, if you want to rotate it, go to Edit > Transform > Rotate, and hold your SHIFT key down if it helps. Product. Custom Shape Tool with these settings Make a shape that looks like mine (Remember to hold SHIFT while you're making the shape to keep it proportional). Image. Now, if you want to rotate it, go to Edit > Transform > Rotate, and hold your SHIFT key down if it helps. Product. |
| step 22 |
|
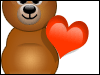 Now it's time to give your Valentine's heart some styles. Give it a Drop Shadow and an Inner Shadow. Finally, give layer “valentine” a shine of 80% width and 85% height and an Layer Opacity of 50%. Product. Now it's time to give your Valentine's heart some styles. Give it a Drop Shadow and an Inner Shadow. Finally, give layer “valentine” a shine of 80% width and 85% height and an Layer Opacity of 50%. Product. |
| step 23 |
|
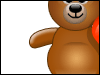
 (New layer => “right hand”) Make a circle with a Fixed Size of 17px by 20px. Now go to Select > Transform Selection, and type in 45 for the Angle Rotation Degrees (leave everything else as it is). Image. Fill it in with your “Light Brown” Color. Image. Give it a layer style: Inner Shadow. Product. (New layer => “right hand”) Make a circle with a Fixed Size of 17px by 20px. Now go to Select > Transform Selection, and type in 45 for the Angle Rotation Degrees (leave everything else as it is). Image. Fill it in with your “Light Brown” Color. Image. Give it a layer style: Inner Shadow. Product. |
| step 24 |
|
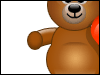
 (New layer => “right hand shine”) Give layer “right hand” a shine of 90% width and 100% height and an Layer Opacity of 70%. Image. Now Give layer “hand right” a gloss with a Layer Opacity of 100%. Product. (New layer => “right hand shine”) Give layer “right hand” a shine of 90% width and 100% height and an Layer Opacity of 70%. Image. Now Give layer “hand right” a gloss with a Layer Opacity of 100%. Product. |
| step 25 |
|
 (New layer => “left arm”) It's time to get out the Pen Tool. Now make a shape that looks like this. Take note in that image: the number of points, where they are, and their angle of curve and how much curvage they have. It'll just make it easier for you to make a shape that looks like mine. Now make that shape your “Light Brown” Color. Image. Now give it some layer styles: a Stroke and a Bevel and Emboss. Product. (New layer => “left arm”) It's time to get out the Pen Tool. Now make a shape that looks like this. Take note in that image: the number of points, where they are, and their angle of curve and how much curvage they have. It'll just make it easier for you to make a shape that looks like mine. Now make that shape your “Light Brown” Color. Image. Now give it some layer styles: a Stroke and a Bevel and Emboss. Product. |
| step 26 |
|
 (New layer => “left hand”) Make a circle with a Fixed Size of 14px by 17px. Fill it in with your “Light Brown” Color. Image. Give it some styles: Stroke, and an Inner Shadow. Product. (New layer => “left hand”) Make a circle with a Fixed Size of 14px by 17px. Fill it in with your “Light Brown” Color. Image. Give it some styles: Stroke, and an Inner Shadow. Product. |
| step 27 |
|
 (New layer => “left hand shine”) Give layer “left hand” a shine of 100% width and 100% height and an Layer Opacity of 75%. Product. (New layer => “left hand shine”) Give layer “left hand” a shine of 100% width and 100% height and an Layer Opacity of 75%. Product. |
| step 28 |
|
 (New layer => “left hand gloss”) Give layer “left hand” a gloss with a Layer Opacity of 100%. Product. (New layer => “left hand gloss”) Give layer “left hand” a gloss with a Layer Opacity of 100%. Product. |
| step 29 |
|
 (New layer => “left hand palm”) CTRL + (Left Mouse) Click to load the selection of layer “left hand” and go to Select > Transform. Make the selection 60% width and 70% height like this. Make a gradient like you would a Shine (described above), and make it look like this image by clicking towards the left-hand side of the selection (as usual), holding SHIFT, and dragging the line out and let go of your mouse when your cursor is on the right edge of the selection to make your gradient. Product. (New layer => “left hand palm”) CTRL + (Left Mouse) Click to load the selection of layer “left hand” and go to Select > Transform. Make the selection 60% width and 70% height like this. Make a gradient like you would a Shine (described above), and make it look like this image by clicking towards the left-hand side of the selection (as usual), holding SHIFT, and dragging the line out and let go of your mouse when your cursor is on the right edge of the selection to make your gradient. Product. |
| step 30 |
|
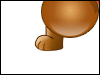
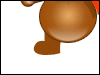 (New layer => “left leg”) Wow, it's really coming along! Grab your Pen Tool again, and make a shape like this one. Again, observe the points' positions and curve amounts. Make the shape's color your “Light Brown” Color. Image. (New layer => “left leg”) Wow, it's really coming along! Grab your Pen Tool again, and make a shape like this one. Again, observe the points' positions and curve amounts. Make the shape's color your “Light Brown” Color. Image. |
| step 32 |
|
 Now, use the same method you used to duplicate the Left Eye and flipped it to make the Right Eye (see step 7), and duplicate, merge, and flip horizontal your left leg layers, and slide it to the right to form the Right Leg. Call that layer, well, “right leg.” Product. Now, use the same method you used to duplicate the Left Eye and flipped it to make the Right Eye (see step 7), and duplicate, merge, and flip horizontal your left leg layers, and slide it to the right to form the Right Leg. Call that layer, well, “right leg.” Product. |
| conclusion |
|
Wow, you're done! Final Product. Good luck... you might need it.
|


 Give layer “left leg” some layer styles: a


