
|
STEP ONE
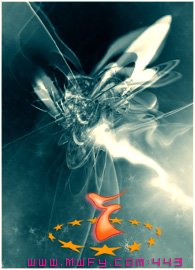
So, let's learn how to create a cool smokey feel as seen in a piece of mine called 'madagascar'. This effect works best on renders that have some long lines that are relatively straight, as you can see in the opposite image. Before we get started, I'd like to thank Daniel Jansson for introducing me, in a round about way, to this technique :)
Step One is to open your render, and duplicate your base layer in photoshop. |
 |
STEP TWO
Go to 'Filters -> Distors -> Wave' and select it. Use whatever settings are there. I find it works best using a Sine distortion wityh about 5 generators, but you can play around with the settings in there. Apply the wave to the duplicated layer. |
 |
STEP THREE
Go to 'Edit -> Fade Wave' and fade it down to about 50 percent. After you have done this, set the layer to 'Screen' mode. You should have an effect similar to on the right, with the original render prominant, and the streaks now visible.
(NB: Feel free to repeat the wave/fade wave process until you are satisfied with the distortion. Just make sure to move the layer before each wave, or the effect wont work properly) |
 |
STEP FOUR
It's Layer Mask time baby! I like to have areas where there is no smoke distortion, so as to provide a visible contrast with the smokey areas. My layers Mask looks something like this:

Play around with youtr layer masks, maybe create multiple smoke layers, and mask them into different spots. |
 |
STEP FIVE
Time to compose the image! here i've added a little cloud/starfield, and a streak of light (I'll show you how to do that in a different tutorial) to round the piece out. My, how ***y those smokey/wavey bits are! You wonderful, mysterious artist you!
If you'd like a bit more clarification on how to do this, you may download the psd I made this tutorial with. (Yes, I'm aware that it is little. It's still enough for you to get the idea though :P)
DOWNLOAD .PSD
w00t! All done! Hope this was helpful. If you'd like to know anyhting else, or give me some feedback, please use the contact form! |


