Abstract Swirls
[ 作者来源:Milkdrop/biorust
编辑整理:
PhotoShop资源网
更新时间: 2006-07-19
录入: 黄叶飞扬 ]
Abstracts are great - they don't have to resemble anything specific, nor do anything constructive, other than sit and look cool. Used appropriately they can even be your key to fantastic-looking wallpapers and artworks. There are, as you would expect, a multitude of techniques for creating different abstracting effects. Here's how you make simple swirls...
|
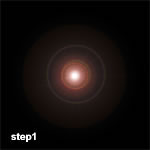
Step 1: Create a blank 400px by 400px document and fill the background layer with a solid black colour. Now select Filter > Render Lens Flare from the menu, and create a simple lens flare in the middle of the image. Leave all the settings on their defaults. |
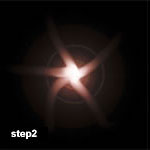 |
Step 2: Now, using the Smudge Tool, start smudging the lens flare from the centre to the outer tips. Follow my example to the left, making sure you have the following tool settings:
Brush Size - 27px
Mode - Normal
Strength - 50% |
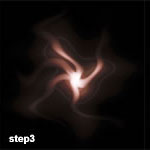 |
Step 3: Now to randomize our image a little further. Go back to the main menu and choose Filter > Distort > Wave. Play around with the settings until you have a result a little like mine on the left. Of course, you can also just click the 'randomize' button until it settles on something cool. Either technique works just fine. |
 |
Step 4: Layer > Duplicate this layer and repeat step 3 with the new layer. Finally, set the top layer's blending mode to Screen, and move it about until it looks cool. Repeat this as often as it is required to suit your own personal tastes. |
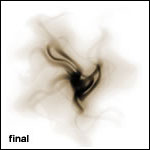 |
Step 5: Now simply merge all the layers together with the Layers > Flatten Image menu option, and there you have it - a cool little abstract of your very own! As an optional step you can even use the Image > Adjustments > Invert command to create the negative image shown off to the left, and/or give it a little colour with Image > Adjustments > Hue / Saturation. Its all up to you really. Have fun! |
≡★ 免 责 声 明 ★≡
除本站原创外,本站所提供的所有教程均收集整理自网络,其版权归该教程直原始作者或原始出处所有!
除特别声明外,您可以在保持教程的完整和注明来源的前提下免费复制、转贴本站所提供的所有教程;但是,不可以盗链本站的图片!
除特别声明外,在未经许可的情况下您不得将本站所提供的任何教程(包括资源)用于商业用途;
如果确有需要,请自行与该教程的原始所有权者(即:原始作者或出处)联系,本站不提供相关服务;否则,由此而引发的一切后果由您自负!


