 |
Step 1: Create a new document and fill the background with whatever colours, gradient, or pattern you desire. In my example I've opted for a size of 200x85px and filled it with a white-grey gradient. |
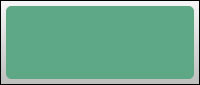 |
Step 2: Create a new layer called LCD. Using either the rounded The Rectangle Tool allows you to draw squares and rectangles.'); Activate();" onmouseout=deActivate() href="javascript:void(0)" alt="">Rectangle Tool, or your own method, create a box with rounded edges and fill with the colour #60A987. |
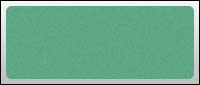 |
Step 3: LCD screens are an irregular mix of liquid crystals. Recreate this effect by selecting Filter > Noise > Add Noise from the menu. Set the amount to 2, distribution to Gaussian, and check monochromatic. |
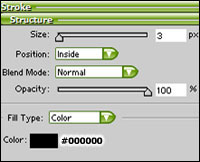 |
Step 4: With the LCD layer active, click on Layer > Layer Style > Stroke in the menu and fill in the settings as they are on the left. This will create the black inner border present on many LCD interfaces (and probably your monitor too). Set the size to whatever you feel is appropriate to your interface - you'll see the effect immediately in the background. |
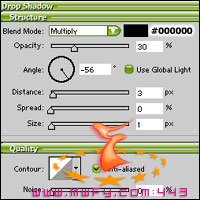 |
Step 5: Without leaving the layer effects screen, progress onto the drop shadow section and enter the settings on the left. This step can be omitted if your background is of the darker variety - its only included with my light background because step 6 doesn't generate a very discernable inset otherwise. |
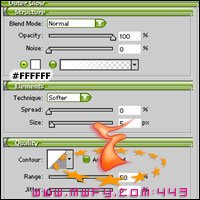 |
Step 6: Progress onto the 'outer glow' section and fill in the settings on the left. This will create a light halo around the LCD screen and help it look like its inset into the background. If the effect is a little too strong in your project, consider reducing the opacity setting a little. |
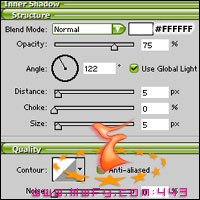 |
Step 7: Ok, now we're getting towards the main meat of the tutorial. Enter these settings into the inner shadow section of layer effects. The result is almost imperceptible, but it'll slightly lighten the top edges of the LCD, but not show through the stroke effect. If you want more highlighting, adjust this setting accordingly AFTER you have gone through steps 12 to 14. |
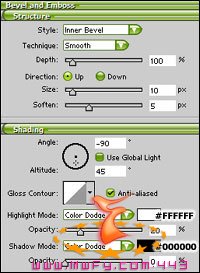 |
Step 8: This is an optional step, but will make the 3D effect a bit more realistic. Enter the 'bevel and emboss' section and duplicate these settings. This will add a slight glow at the bottom of the LCD, almost like light is reflecting off the inside. You can change the shape and intensity of the effect by altering the depth and opacity accordingly. You can now leave the layer effects dialog by clicking OK. |
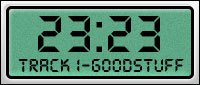 |
Step 9: Looking good isn't it? Now you should add some text using the text tool and an appropriate font. I use DS-Digital and LcdD extensively - you can download them from all good font resource websites. |
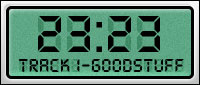 |
Step 10: Now create a new text layer beneath the main text layer with lots of 8's to mimic LCD burn-in. Change the blending options in the layer palette to 'soft light' and the opacity to 50%. Then move it about until it looks good. |
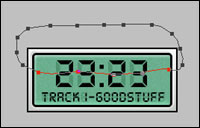 |
Step 11: OK, now for the hardest part of the tutorial. Select the pen tool and draw a path similar to the one on the left. Create a new layer on top of everything else called highlight. Make it the active layer. Go to the path palette, right-click the path, and select 'make selection'. Then pick Edit > Fill from the menu and fill the selection with white. |
 |
Step 12: Press Control + D to lose the current selection. Then run the Filter > Blur > Gaussian Blur filter with a setting of 5-10 pixels. With the layer palette active, Press CTRL on your keyboard and click on the LCD layer to establish a new LCD-shaped selection. |
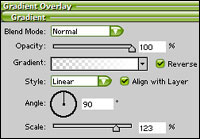 |
Step 13: Invert the selection by clicking on Select > Inverse from the menu. Then, with the highlight layer active, press delete on the keyboard once. As a final step, select Layer > Layer Style > Gradient Overlay and enter in the settings on the left. Press ok and reduce the highlight layer's opacity to 50%. |
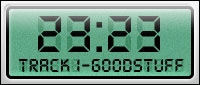 |
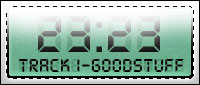
Step 14: Et voila, your finished masterpiece! If the highlight layer is a little too bright or sharp, try reducing the opacity further or Gaussian Blur it a little more. |
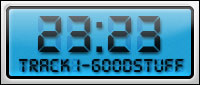 |
Step 15: Play around with the layers to achieve the result you desire. Adding a drop shadow to the active LCD text using layer effects can also be helpful. Remember that the screen doesn't have to be green! Have fun! :) |


