FreeForm Interface
[ 作者来源:purephotoshop/Tutorials
编辑整理:
PhotoShop资源网
更新时间: 2006-07-18
录入: 黄叶飞扬 ]
This tutorial introduces you to creating freeform interfaces. Some
examples would be like the Winamp 3 and 5 skins, Windows Media Player
skins, etc. Basically it involves shapes that are not squaure,
rectangular, etc. I'm not stating that these type of skins never
contain these elements, but most are done in a 'free form' style.
1.
Create a new document, 400X300 with a white background. Now create
a new layer and name this layer 'base'. Now set #3D3D3D as your
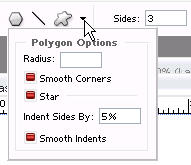
foreground color and then grab your
Polygon Tool and make sure
it is set to 'Shape Layers' up at the top left of your screen. Then
click your Star shape up top and make sure you have your settings like
the image below.
Set Your indent sides to 50%. For some reason My image only says 5%..must have snapped it to quick.

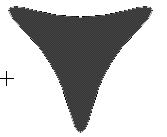
2. Now that we have our tool set up, hold down shift and draw out a
shape like mine. Now create a new layer above that and set your
foreground color to #FE6901 and grab your Elipse Tool. Note:
This is not the circular marquee tool! Now create a new layer above
your base layer and name this layer 'Elipse'. Drag out your elipse
like my image.

Now go back to your base layer and apply a 1 pixel inside black stroke,
and do the same for your Elipse layer.
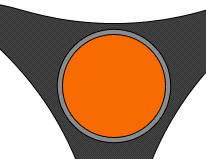
3. Now Duplicate your elipse layer by rightclicking it in the layers
pallete and select duplicate and then move it below our first elipse
layer, Name this layer 'Inset'. Now set your foreground color to
8A8A8A and then press Alt+Backspace to fill this new elipse with that
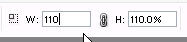
color. Now go to Edit>Free Transform and up at the top press the chain
link icon in between the width and height box and then enter 110 into
the width box. (Note: This might vary depending on how large you drew
out your Elipse.)
Now we have all of the shapes we are going to work with. The reason I
used shapes and paths instead of the selection tools is because I can
easily modify the shape by adding points and moving points if I decide
I want to give something a slightly different shape. This is how I like
to work. I like to set up my shapes first before I do any detail work.
Now that we are satisfied by our shapes, lets rasterize our layers.
Right click on each layer we created and select 'Rasterize Layer'
(base, Inset, Elipse).
4. Now ctrl+click your 'base' layer and then create a new layer right
above it. Set your foreground color to a lighter shade of grey, I set
mine to 737372, but its not an exact science. Now grab your brush
tool, I set my tip to about a 45 pixel soft brush and then my opacity
to 22% and flow to 70%. Now start adding the highlights to your
interface, focusing on the middle sections of the grey area or our base
layers shape.

Now set your foreground color to a little bit lighter grey (ABABAA if
you must know) and about a 21 pixel soft brush and start adding more
highlights. Don't be scared that is looks sorta blotchy and blocky at
the moment, were gonna clean all that up soon. Now set your foreground
color to black or almost black and go right around the edges. Make
sure your selection is still present while doing all of this! . Here
is what mine looks like after the first round of highlights and
shadows.

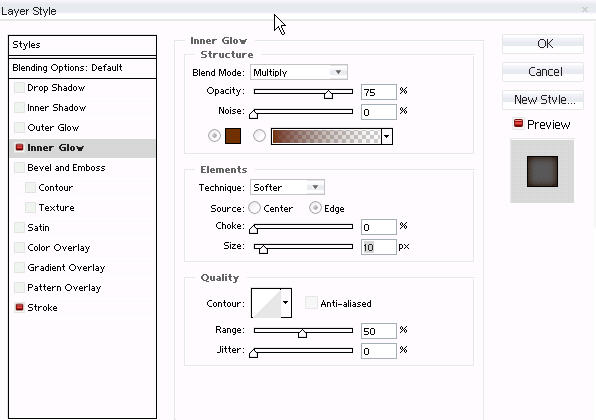
5. Now lets move on to our elipse because its feeling a little
neglected. Click on your elipse layer and then click the littel 'f'
and apply an inner glow with
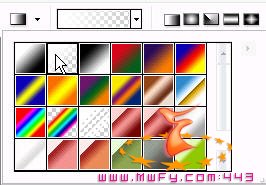
THESE settings. Now ctrl+click your 'Elipse' layer and then set 'white' as
your foreground color, now
Create a new layer above your elipse layer
and name it 'Elipse_Highlight'. Now grab your linear gradeint tool and
then set your gradient to 'Foreground to Transparent' (Second Block
over in your gradeint pallete' See Image Below).
Now going from top to bottom while holding shift fill your new layer
with that gradient. Now press ctrl+d to deselect and then go to
edit>Free Transform and now holding shift, grab the bottom right corner
and scale it down a bit, press enter to commit the transform and then
move it to the mid top part of your Elipse.
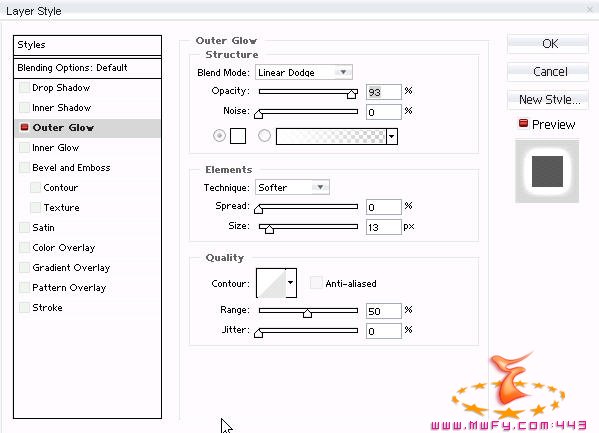
Now on that same layer, click the little 'f' in the layers pallete and
select outer glow. Set the color to white, mode to color dodge and size
to 7. Everything else can remain. Now press ok and then change that
layers blend mode to 'Overlay' and drop the opacity to about 79%.
6. Now create a new layer above your Elipse_Highlight layer and name
it 'Hot Spot'. Now set white as your foreground color and then grab
about a 9pixel soft brush and just rub a small blotch in about the top
left of your elipse highlight. Make sure your brush is set to 100%
opacity, remember we want this spot to catch alot of light. Then apply an outer glow with the settings below
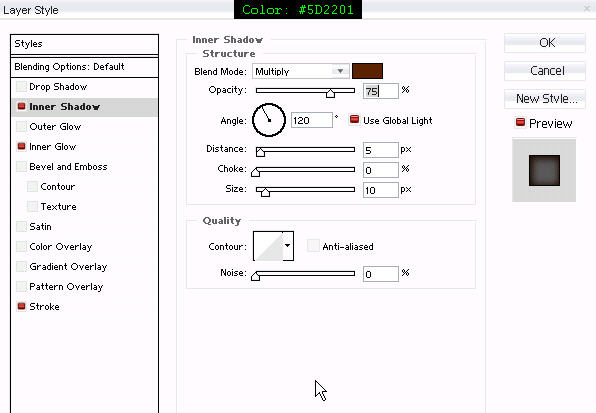
Now go back to our 'Elipse Layer' and apply an inner Shadow with
THESE settings. Notice how I jump from layer to layer. I never completely
finish a layer because there is always tweaking to do, each layer feeds
off each other.
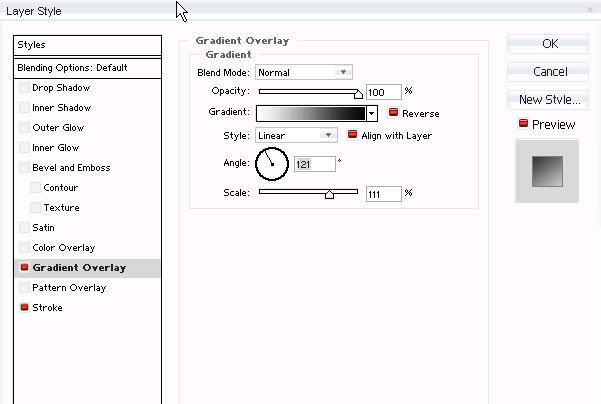
7. Now lets do a little work to our 'Inset' layer. Now click the
little 'f' and select 'Gradient Overlay' and apply
THESE settings. Next I lowered the stroke opacity for the inset layer down
to about 50 or so.

Its looking pretty good, but lets keep going. We still need to smooth
out those blotches a bit for our base layer highlights and shadows.
Ctrl+Click the Base layer and then select the 'Highlight' layer above
it. Now grab your smudge tool and set the tip to about a 19pxl
hard round. Then up top, set its strength to about 12% and just start
making long strokes to the oter edges and just keep blending the
shadows around, etc. Just play with it! If you think your gonna mess
up just make you a duplicate of it and hide it. I then applied a
slight dropshadow to my base layer.

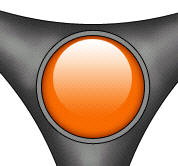
8. Finishing up. Now if your not on your 'highlight' layer then get
there now. Now we want to get a little more 'realism' out of our metal
so lets grab our 'dodge tool'. Set it to about a 45pixel soft brush,
Range:Higlights and Exposure:65. Now just start dodgeing around your
sphere inset and down the middle portions of where our base layer is.

Thats it! If you want, keep going and keep redefining your skin, Add
more layers and shapes to it. Add some details, text, etc.


