 |
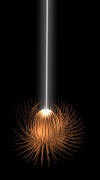
1: Take any spare 3d piece you happen to have lying around or use the pen tool to make your own (a torus with a matrix extrude is what mine is). The point from which the beam originates is where you will need to do a little brightening. If you have a bright light source, then the areas around it will need to be lit by it.
Select your airbrush tool and go to the top where you see "mode:" and change that to Linear Dodge. Then, with a low flow (around 8%), go over the source area and brighten it up a bit...be careful not to overdo it.
Note: The size and intensity of your beam will govern how bright and widely your 3d object will be lit. Don't dodge your 3d object as much as I did if your beam is humongous. |
 |
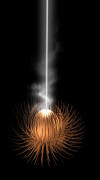
2: Here's the part where you make your object look like it's being abducted by aliens. Get your pen tool and click once where you want the beam to come from and once off-canvas (where it will point). If you want your beam to be straight, hold shift. You may also try curving your beam.
Now, keep your pen path there and select your airbrush. Make the brush size about 100 (this all depends on the size you want) with a flow of about 15% and go back to your pen tool. Right-click with the pen tool on the canvas and select "stroke path". In the drop-down menu, select 'airbrush' if it is not already selected then hit 'ok'. You will see that the path you made with the pen tool has been neatly brushed. Still keeping your pen path there, go back to your airbrush and decrease the size by larger to smaller increments while keeping the flow at 15%. Your last stroke will be the core of your beam. In this case, I used a size 3 brush at 50% flow. If you don't understand how I got this beam to glow, see my 'glow' tutorial. (if it's done yet). |
 |
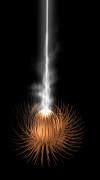
3: In this section of the tutorial, you can add any little fluffy things you want. In my case, I lightly brushed around the source following the beam up. Then, I went to filter > distort > wave. I recommend you use the default settings with the type being "sine". |
 |
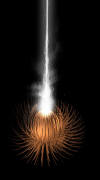
4: Here, I brushed pretty much the same thing I brushed in the pervious step but this time with a slightly lower flow and I did NOT apply the wave filter. If you want your brushing to fade out as it goes out, use your eraser at a low flow with a large brush and erase the tips where your brush abruptly ends so they fade out. |
 |
5: On this step, you may or may not choose to add lightning to it- I thought it would be cool so I did. Grab your pen tool and make a wild jagged path which will be your 'bolt'. Select your airbrush and make it like a size 1 or 2 with high flow. Stroke the path with the pen tool like you did to make your beam (but this time it's only using one brush size).
If you lightning is too dull, duplicate the layer and merge the top one down. If it's too bright, decrease the opacity of the layer it's on. You may use the same erasing technique I taught you in the step above to make your bolts fade out. |
 |
6: Time to make some spray. Again, you do not HAVE to do this step. Grab the airbrush, flow: 100%, size: 1 or 2. Click on the brushes tab in the upper right of the screen and go to 'scattering'. Put the count at 1 and you can put the scatter amount as high as you want...this is where you kinda get to do what you want.
If you have no idea what I'm talking about, you can always just individually click to create every particle. |
 |
7: All I did here was brush very lightly (flow: 10%) over the heart of the beam to make it a little brighter and seem more powerful. |
|
Download the .psd |
8: End notes: There are about a billion ways to make a beam- this is only one. Remember that the beam is overdone so be origional
Ways to deviate from my tutorial: Curve the beam, don't have it go off-screen...have a projectile at the front of it shooting towards something, add color, mess with the lighting and particles.
I hoped this tutorial helped- please tell me what you thought of it and how I can make better tutorials in the future. |


