Glass Menu Tutorial
[ 作者来源:Insaze/pictual
编辑整理:
PhotoShop资源网
更新时间: 2006-07-18
录入: 黄叶飞扬 ]
Here you will learn how to make a Menu Navigation with a glass effect.
Ok Let's Start!
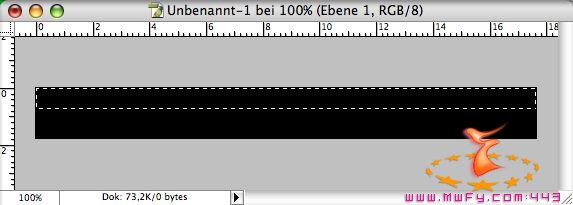
1.Create a new document. (I used a size of 500*50)
2.Fill the background with black color.
3.Then, create a new layer and select about half of the canvas as shown in the picture using the rectangle selection tool.
4.Fill the selection with white color and set the layer opacity to 20%.
5.Then, move the layer down by 3-6 pixels as you like it.(I used 3 pixels)
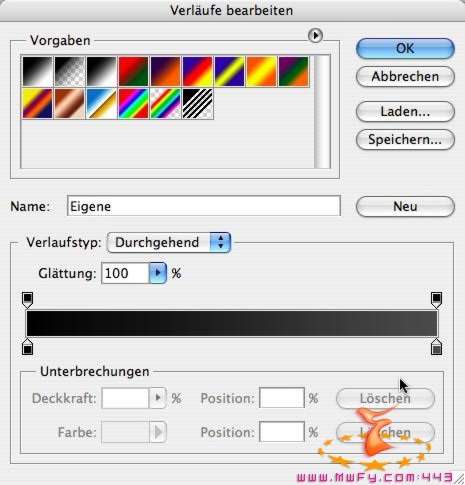
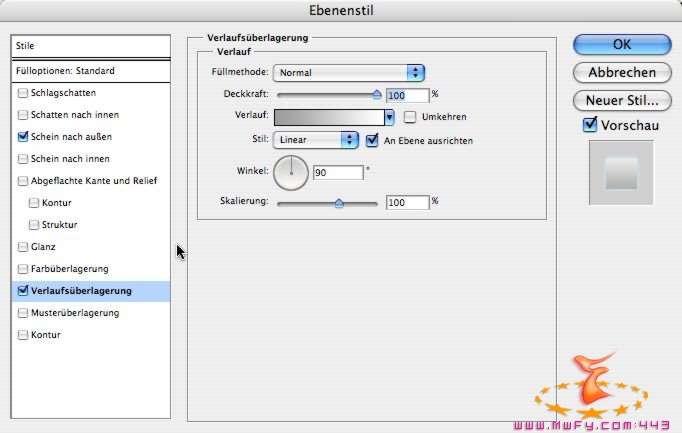
6.Go into the layer style of the black background layer. Select Gradient Overlay and do a gradient like this.
Now it should look like this.
This is the basic shape of our Menu
7.Add some text to the Menu as you like it.
8.In the layer style, Add Outer Shine with a medium blue and default settings.
9.Then add Gradient Overlay and do a gradient from White to a light grey.
Then I changed the text because I was told it fits a
menu better to be 1337.

10.Ok Make lines to separate the
menu objects with black color. Then, duplicate the layer and move it 1 pixel to the left and color it with a dark blue. This gives the whole thing a 3D touch.
≡★ 免 责 声 明 ★≡
除本站原创外,本站所提供的所有教程均收集整理自网络,其版权归该教程直原始作者或原始出处所有!
除特别声明外,您可以在保持教程的完整和注明来源的前提下免费复制、转贴本站所提供的所有教程;但是,不可以盗链本站的图片!
除特别声明外,在未经许可的情况下您不得将本站所提供的任何教程(包括资源)用于商业用途;
如果确有需要,请自行与该教程的原始所有权者(即:原始作者或出处)联系,本站不提供相关服务;否则,由此而引发的一切后果由您自负!